Overview
Adlertag, or “Eagle Day,” marked the formal beginning of the Luftwaffe’s main offensive against Britain during the Battle of Britain. After weeks of probing attacks on Channel convoys during the Kanalkampf, the German High Command shifted to a concentrated effort aimed at destroying RAF Fighter Command on the ground and in the air. The objective was straightforward: eliminate Britain’s air defence system, gain air superiority, and clear the way for Operation Sea Lion, the planned invasion of southern England.
The Luftwaffe assembled three air fleets for the assault, deploying hundreds of bombers—Heinkel He 111s, Dornier Do 17s, and Junkers Ju 88s—supported by Bf 109 and Bf 110 fighters. Their targets included radar stations, sector airfields, aircraft factories, and communications hubs across southern England. German planners believed that by overwhelming the RAF’s infrastructure, they could force British fighters into a losing battle of attrition.
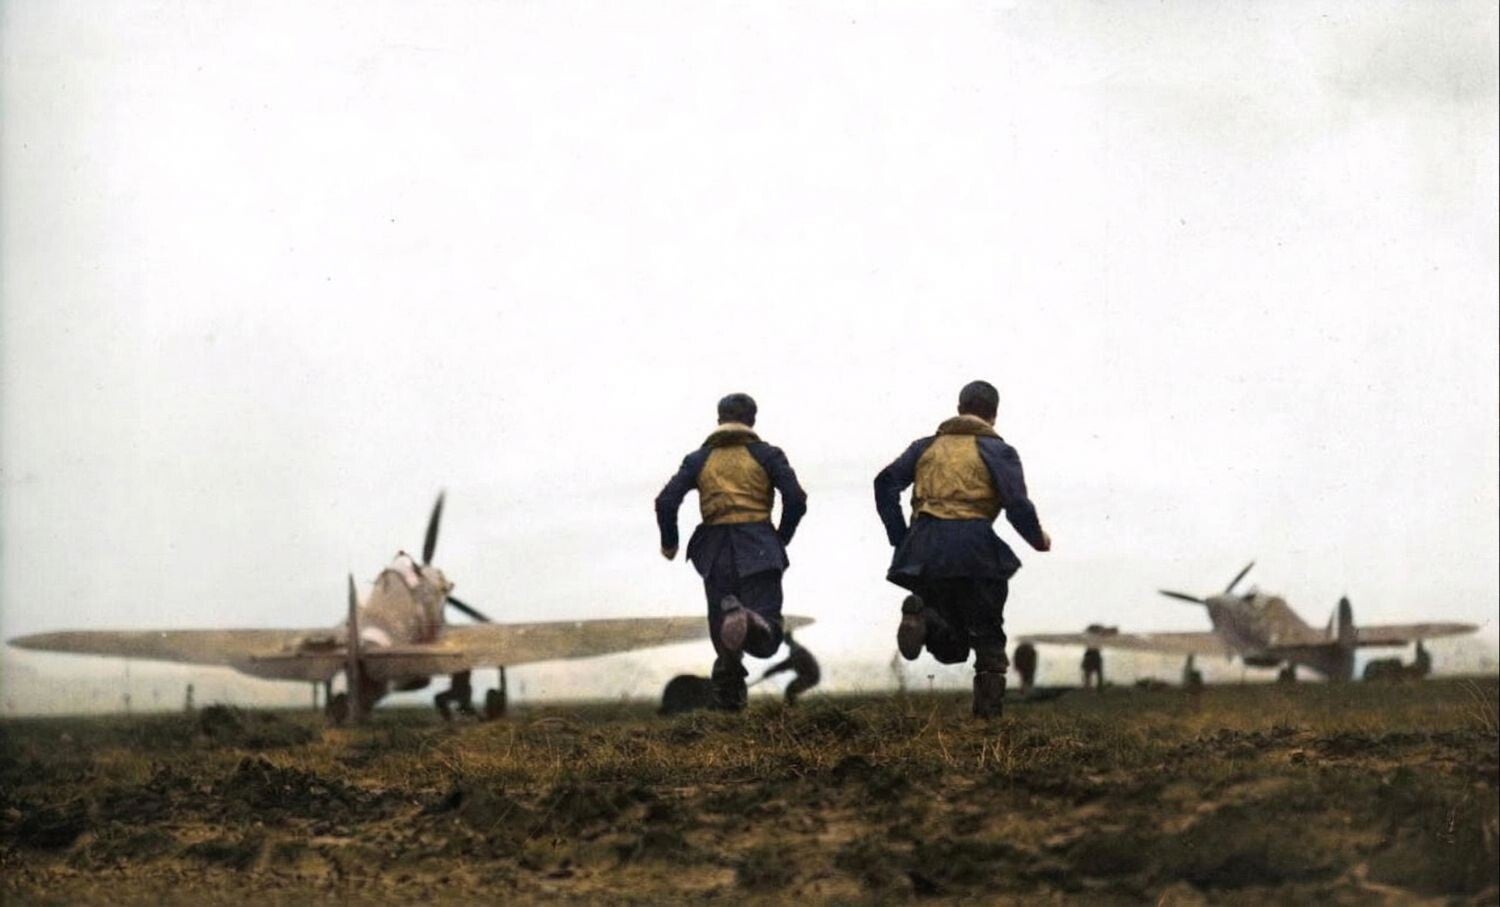
RAF fighter pilots rush to their planes during another scramble. The Adlerangriff (“Eagle Attack”), launched by the Luftwaffe in August 1940, marked a sharp increase in the intensity of the air war over Britain. Large, coordinated raids targeted RAF Fighter Command airfields, radar stations, and aircraft factories. Sortie numbers rose dramatically, with sustained daylight bombing designed to overwhelm British defenses. Losses mounted on both sides as the tempo of operations quickened, pushing pilots, ground crews, and civilians into an exhausting struggle for survival.
https://military-history.gr/1940-08-18-the-hardest-day/#goog_rewarded
On 13 August 1940, the offensive began, though weather disruptions caused confusion and scattered attacks. Some raids struck their intended targets, damaging airfields and installations, but others missed entirely or arrived uncoordinated. British radar and the Dowding system allowed Fighter Command to respond efficiently, scrambling Hurricanes and Spitfires to intercept incoming formations. Several German units suffered heavy losses, particularly unescorted or poorly timed bomber groups.
Despite setbacks, the Luftwaffe continued large‑scale raids throughout August, intensifying pressure on RAF squadrons. Airfields in Kent, Sussex, and Hampshire endured repeated strikes, and ground crews worked around the clock to repair runways and replace damaged aircraft. Yet the RAF remained intact. Radar stations were quickly restored, pilots rotated between squadrons, and British aircraft production kept pace with losses.
Adlertag demonstrated both the strength and limitations of the Luftwaffe. While capable of inflicting serious damage, it failed to cripple Fighter Command. Instead, it marked the beginning of a prolonged struggle in which Britain’s integrated air defence system proved more resilient than German planners had anticipated.
Adlerangriff - The main attack
Setting the stage for Operation Sealion
Adlertag - (“Eagle Day”) - marked the opening of Unternehmen Adlerangriff (“Operation Eagle Attack”), the Luftwaffe’s grand attempt to crush RAF Fighter Command and clear the way for an invasion of Britain.
This phase of the Battle of Britain lasted from 13th August to 6th September 1940
It came directly on the heels of Kanalkampf (10 July–12 August 1940), the earlier phase of the Battle of Britain in which German forces had probed the Channel convoys, tested British responses, and gathered intelligence.
Having bloodied Fighter Command and drawn its squadrons into battle over the sea lanes, Göring and his commanders believed the stage was set for a decisive blow.

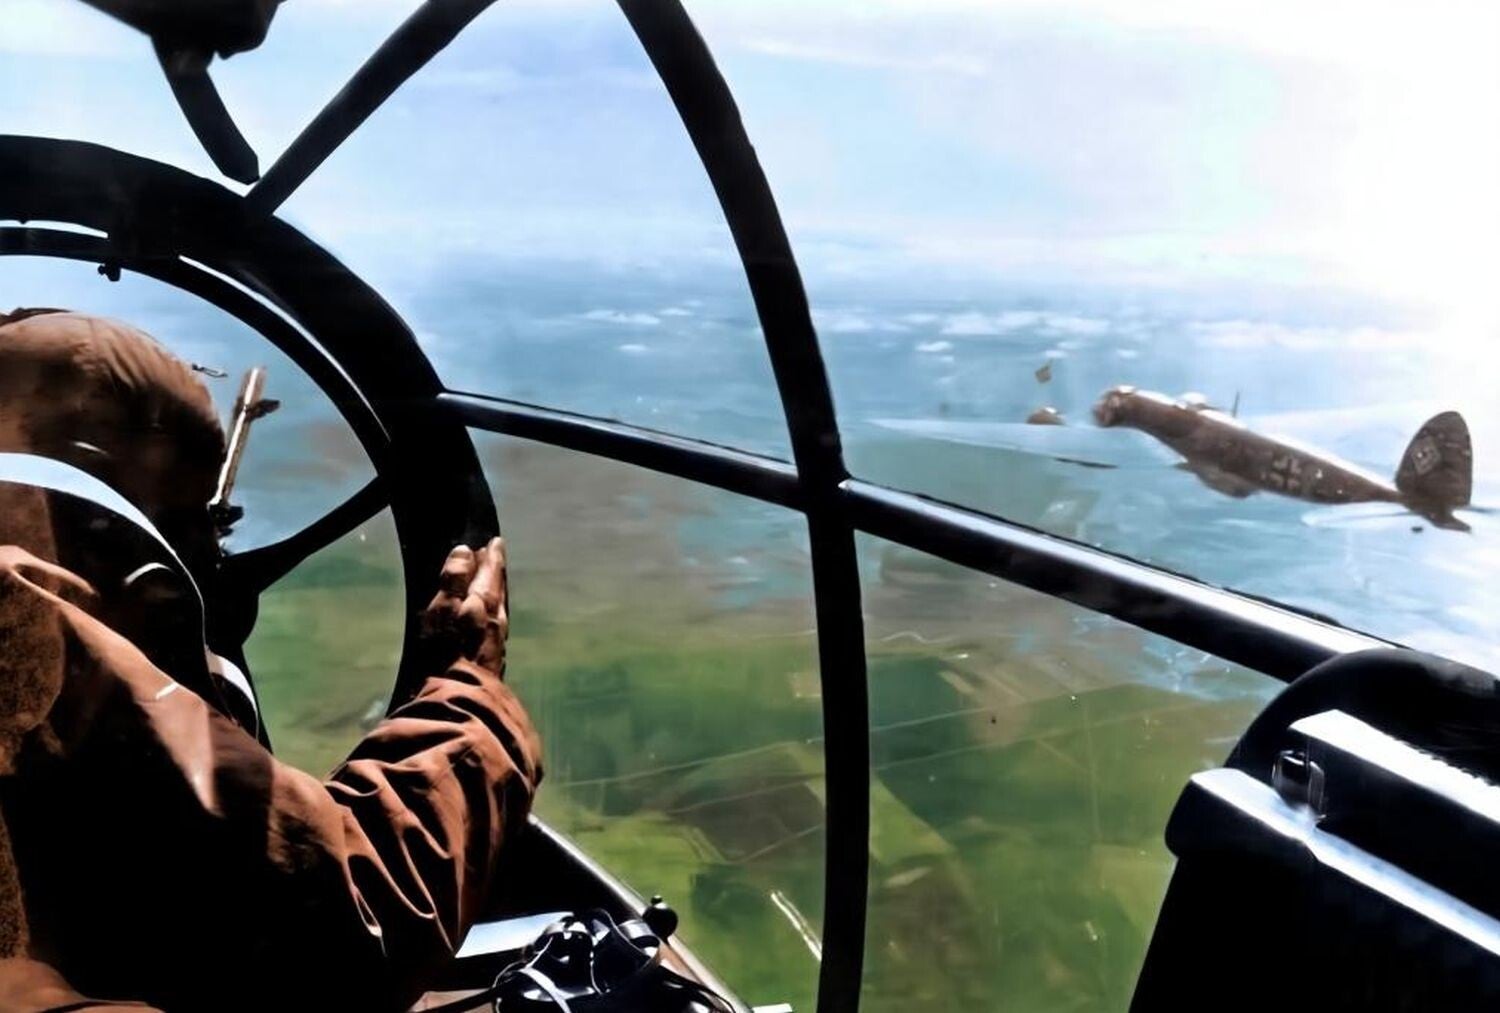
A formation of Luftwaffe JU-88's over England. During Adlerangriff—the sustained assault beginning 13 August 1940—the Luftwaffe sought to annihilate RAF Fighter Command. Göring committed Luftflotten 2, 3, and 5 to coordinated strikes on airfields, radar, and aircraft factories. Waves of bombers, escorted by Bf 109s and Bf 110s, crossed the Channel daily in punishing raids. Though devastating in scale, with hundreds of sorties launched, the offensive overstretched German resources. Heavy losses, especially among bombers and Bf 110s, revealed the limits of the Luftwaffe’s strategy.
...destruction was paramount...

The wider context was unmistakable.
On 16 July 1940, Hitler issued Directive No. 16, outlining provisional plans for Operation Sea Lion, the invasion of Britain.
Yet no landing could be contemplated until the Luftwaffe had secured air superiority.
The RAF’s destruction was paramount—not only to prevent it from striking the invasion fleet, but also to deny cover to the Royal Navy’s Home Fleet, which posed the greatest threat to any attempted crossing.

In 1940, colossal battleships like HMS Hood epitomized British sea power, symbolizing the global reach and dominance of the Royal Navy. With its immense size and firepower, the Hood represented a powerful deterrent, serving as the flagship of the Home Fleet. This fleet's very existence profoundly affected German strategy, particularly regarding Operation Sea Lion (the invasion of Great Britain). The presence of the Home Fleet, with its capital ships, meant the German Kriegsmarine could not guarantee control of the Channel, making a large-scale seaborne invasion fundamentally impossible. The threat of the Hood and her counterparts contained the German surface fleet, forcing Germany to rely instead on air and submarine warfare.
https://www.warhistoryonline.com/whotube-2/hms-hood-and-other-ships-in-color.html
...the sheer resilience of Fighter Command...
On 1 August, Göring received Directive No. 17, authorising an all-out assault on British air and sea power.
Preparations for Eagle Day had begun in late July, but poor weather repeatedly delayed the start.
At last, on 13 August 1940, the assault was unleashed. Luftwaffe raids hit airfields and radar stations, inflicting damage and casualties.
Yet faulty intelligence, miscommunication, and the sheer resilience of Fighter Command blunted the impact.
The RAF was bloodied, but not broken. Its vital command and control network remained intact, and squadrons quickly regrouped.
Göring had promised Hitler swift results—days, or at most weeks.
Instead, Adlertag revealed the same misjudgements that had haunted Kanalkampf: overconfidence, flawed planning, and a failure to understand the RAF’s strength.
Eagle Day was intended as the beginning of the end for Fighter Command, but it became the prelude to the Luftwaffe’s frustration and the indefinite postponement of Operation Sea Lion.

German Fuhrer Adolf Hitler (left) and Head of the Luftwaffe, Hermann Goering (right). Under pressure from Hitler, Reichsmarschall Göring rushed Adlertag preparations, making critical mistakes. Göring grossly misjudged the RAF's strength and relied on flawed intelligence that promised the destruction of Fighter Command in just four days. This overconfident timeline, coupled with his distant command from a luxury train, injected fundamental flaws into the entire offensive.
Rare Color Photo of Adolf Hitler (1889-1945) and Hermann Göring (1893-1946) : r/wwiipics
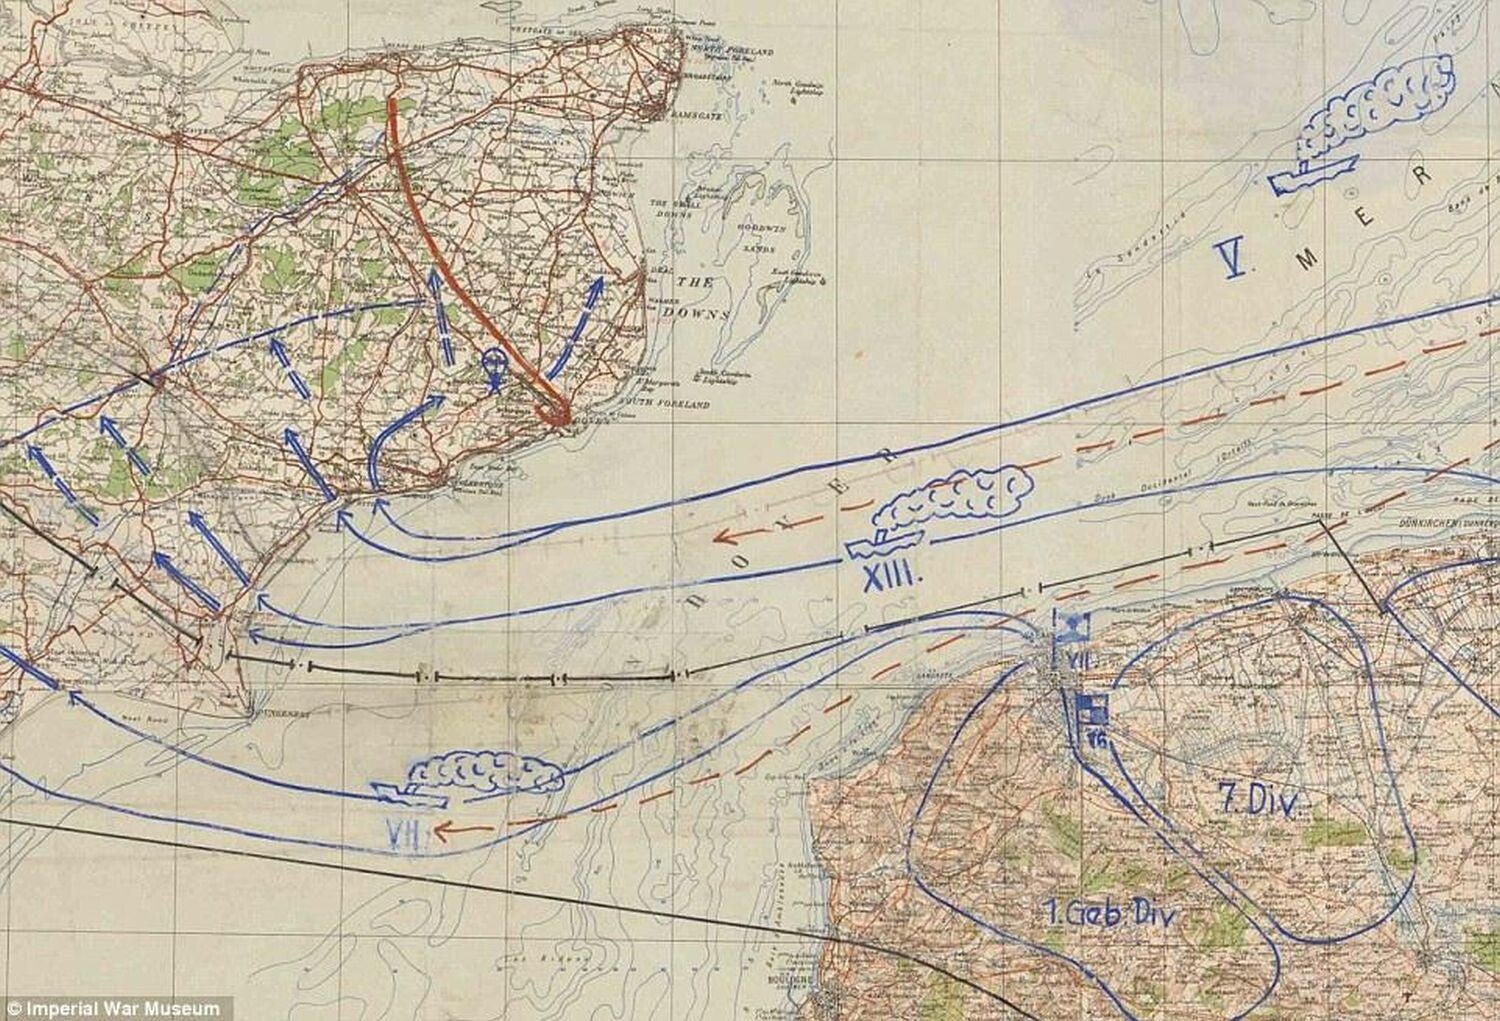
The invasion that never was: Operation Sealion. Unternehmen Seelöwe was the German blueprint for the full-scale invasion of Great Britain, relying on a massive cross-Channel amphibious operation. The invasion plan was never executed because the Luftwaffe was decisively defeated in its fundamental objective: securing air superiority (Luftüberlegenheit) over the RAF during the Battle of Britain. Acknowledging that the unescorted invasion fleet would be destroyed from the air, Adolf Hitler ordered the operation indefinitely postponed in September 1940. Pictured is a German map from 1940-41 of plans for Operation Sealion. In addition to German forces and planned invasion routes, the planner also drew cartoon ships steaming across the English Channel and a stick figure paratrooper over Kent.

Prelude
After Britain and France declared war on Nazi Germany following the invasion of Poland in September 1939, Europe entered nine tense months of stalemate along the Western Front.
This uneasy lull - often described as the “Phoney War”—masked intense planning within the Oberkommando der Luftwaffe (Luftwaffe High Command) and the Oberkommando der Wehrmacht (Supreme Command of the Armed Forces).
By October 1939, German strategists had shifted their focus westward, preparing the next decisive campaign.


British troops reading copies of the Army newspaper 'Blighty' outside their dugout, December 1939. The Phoney War (September 1939 – May 1940) was a period of uneasy calm following Britain and France’s declaration of war on Germany after the invasion of Poland. Despite mobilisations, little major fighting occurred along the Western Front. Allied forces manned the Maginot Line, while the Germans prepared for future offensives. Sporadic skirmishes, naval clashes, and propaganda duels marked the months. This lull ended abruptly with the German blitzkrieg in May 1940, shattering the illusion of stalemate.
...shattered Allied defences...

On 10 May 1940, the German offensive—Unternehmen Gelb (Operation Yellow), also known as the Manstein Plan—was unleashed.
This bold and rapid campaign shattered Allied defences.
The Battle of France ended in catastrophe for the Allies: the main French Army was destroyed, while the British Expeditionary Force narrowly escaped through Dunkirk.
Paris fell on 14 June, and within weeks German forces had swept across much of the country.
On 25 June 1940, France formally surrendered, leaving Britain standing alone against Hitler’s war machine.

French artillerymen reloading a heavy artillery piece of 155mm during the Battle of France, 1940. The Battle of France in 1940 starkly revealed the contrast between French and German forces. France relied on static defences like the Maginot Line, dispersed armour, and cautious tactics, while the Wehrmacht concentrated tanks and mobile infantry in fast, decisive thrusts. German use of blitzkrieg, supported by close air power from the Luftwaffe, overwhelmed French command structures. Despite numerical parity in men and tanks, Germany’s speed, coordination, and adaptability shattered French resistance in just six weeks.
...offering surprisingly lenient terms...
With Western Europe neutralised, the attention of both the OKL and OKW shifted across the Channel.
Hitler initially hoped Britain would seek an armistice, offering surprisingly lenient terms, but Winston Churchill’s coalition government refused all overtures.
Frustrated, Hitler issued orders for preparations for an invasion - Operation Sealion.
To make such an assault possible, air superiority had to be secured.
The Luftwaffe was tasked with destroying the RAF, while the Kriegsmarine was ordered to prepare the transport of German forces across the Channel.
Göring promised swift victory from the skies. If the RAF could be crushed, Hitler believed invasion might not even be necessary.
This aerial offensive was codenamed Adlerangriff - Operation Eagle Attack—the campaign that would lead directly into the Battle of Britain.

British Prime Minister Winston Churchill. Churchill held an attitude of absolute, unyielding defiance toward any German peace overtures in 1940. He firmly rejected negotiations, believing Britain must fight for total victory and viewing any peace offer as a trap designed to secure Nazi dominance over Europe.
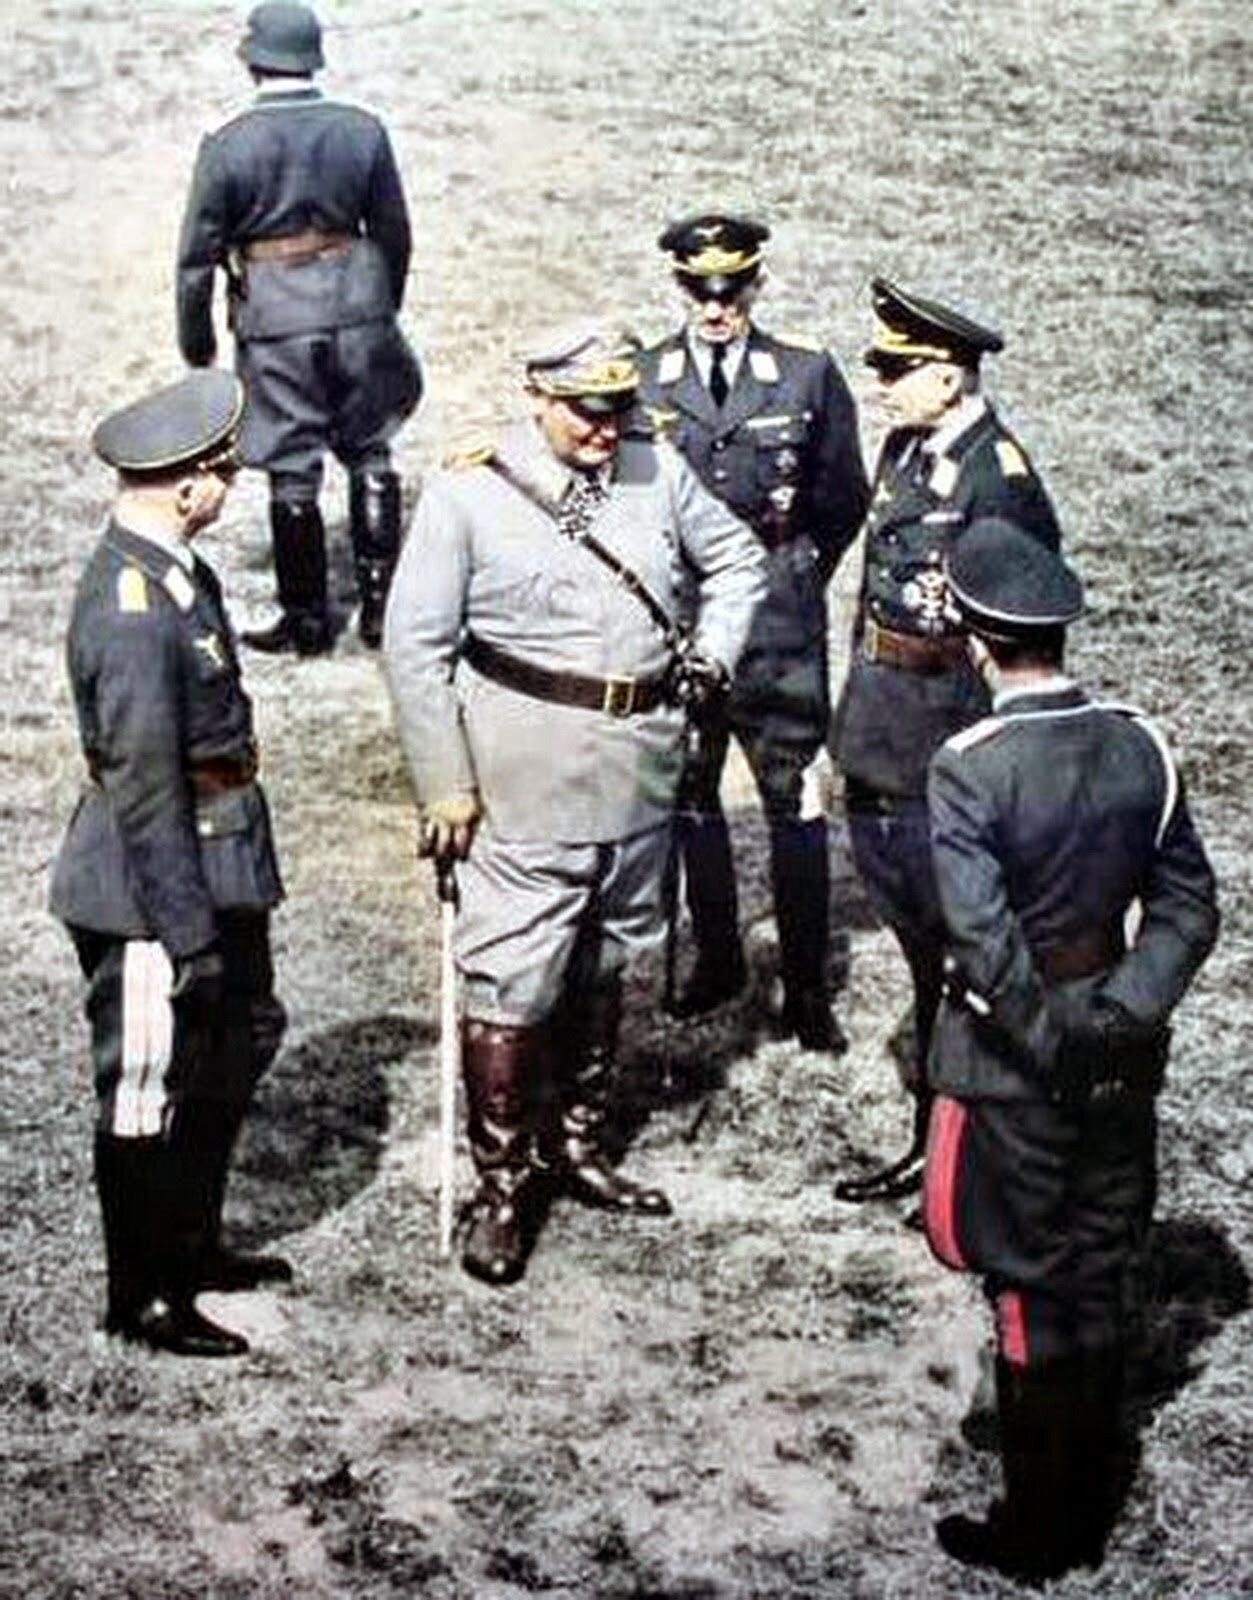
Chief of the Luftwaffe, Hermann Göring and Luftwaffe Generals at Gross-Born. In 1940, Göring made repeated, overconfident promises to Hitler that the Luftwaffe would secure air superiority in days, not weeks. He vowed to decisively destroy RAF Fighter Command and clear the skies for Unternehmen Seelöwe, guarantees that ultimately proved to be based on disastrously flawed intelligence.
From left to right: unidentified Luftwaffe general, Reichsmarschall Hermann Göring (Oberbefehlshaber der Luftwaffe), General der Flieger Gustav Kastner-Kirdorf (Chef des Luftwaffen-Personalamt), and General der Fallschirmtruppe Kurt Student (Kommandierender General der Fallschirmjäger). The picture was taken in May 1942 when Göring visited the Truppenübungsplatz (Training Area) Gross-Born in Pomerania and inspected 2,000 Luftwaffe officers and NCOs for the event of "Kriegsalltag im Deutschen Reich"
World War II in Color: Hermann Göring and Luftwaffe Generals at Gross-Born

The First Phase: Kanalkampf
The Luftwaffe entered the Battle of Britain already weakened by the heavy fighting of the spring campaigns.
During the conquest of France alone, over 1,400 aircraft had been lost, while earlier operations in Poland and Norway during 1939 had cost over 400 machines.
These severe losses forced the German air force into a period of rebuilding before any major assault could be directed against the Royal Air Force.
Only once its strength had returned to an acceptable level did the Luftwaffe begin the first stage of its offensive against Britain.


A Messerschmitt Bf 109E3 1.JG54 White 3 during the Battle of France, May 1940. The Luftwaffe sustained significant attrition during the six-week Battle of France, losing approximately 1,400 aircraft destroyed or seriously damaged—around 30% of its combat strength. Aircrew casualties surpassed 1,100 men, straining the reserves of experienced personnel. While the campaign was a decisive military victory, these heavy losses necessitated a critical period of replenishment and reorganization before the air force could commit to the upcoming Battle of Britain.
Asisbiz Messerschmitt Bf 109E3 1.JG54 White 3 Battle of France May 1940-01
...sought to provoke Fighter Command...

That opening phase, known as the Kanalkampf - the Channel battle - began on 10 July and ran through to 8 August 1940.
It did not initially focus on RAF airfields deep inland, but instead sought to provoke Fighter Command into combat by attacking British Channel convoys.
The logic was straightforward: by drawing the RAF into repeated defensive battles over the Channel, the Luftwaffe hoped to wear down its pilots and aircraft before launching a decisive strike.
Yet in practice, the results were disappointing. In terms of shipping losses, only 24,000 tons were sunk, while minelaying operations proved somewhat more effective, accounting for 38,000 tons.

A British convoy, and shows the ship moving through a sea lane under protection of the British navy. During the Kanalkampf in July 1940, the Luftwaffe aimed to draw out the RAF by targeting convoys in the English Channel. German bombers and fighters attacked coastal shipping, hoping to provoke Fighter Command into engaging under disadvantageous conditions. The campaign combined reconnaissance, bombing, and strafing of merchant vessels and their escorts, disrupting supplies and testing British air defences. While the Luftwaffe inflicted damage on convoys, the RAF largely resisted being lured into large-scale battles, instead using radar and coordinated interceptions. The Kanalkampf thus served as both a training ground and attritional phase ahead of the wider Battle of Britain.
...bloodied but unbroken...
For Fighter Command, the cost was comparatively light.
In July, 74 fighter pilots were killed or went missing, with another 48 wounded, but the overall strength of the RAF actually increased, rising to 1,429 operational aircraft by 3 August.
Shortages remained - 124 pilots below establishment—but these were far from critical.
The Kanalkampf had failed to inflict decisive damage, and the RAF entered August bloodied but unbroken.
A wrecked Hawker Hurricane fighter, 1940. During July 1940, the Royal Air Force suffered significant losses as the Luftwaffe intensified its attacks during the early stages of the Battle of Britain. A total of 74 fighter pilots were killed or went missing, a stark indicator of the intensity of aerial combat over southern England. In addition, another 48 pilots were wounded, either temporarily or seriously, reducing operational effectiveness. These casualties highlighted the immense pressure on Fighter Command and underscored the courage and sacrifice of RAF pilots defending Britain’s skies.
...all marked for destruction...
The second phase of German attacks unfolded between 8 and 18 August.
Shipping remained a target, but now coastal airfields, radar stations, and positions south of London were brought under attack, with raids also reaching as far north as Liverpool under cover of darkness.
On 12 August, the Luftwaffe mounted its first major inland strikes.
RAF stations at Hawkinge, Lympne, and Manston, along with radar stations at Pevensey, Rye, and Dover, were all marked for destruction.
Portsmouth docks were also bombed.
A Heinkel He 111H bombardier points the way to the target, 1940. In early August 1940, the Luftwaffe shifted from the Kanalkampf - attacks on Channel convoys - to Adlerangriff (Eagle Attack), a direct assault on the RAF. German strategy now focused on destroying Fighter Command by bombing airfields, radar stations, aircraft factories, and command infrastructure. This marked a significant escalation in the Battle of Britain, with massed bomber formations heavily escorted by fighters. The aim was to gain air superiority ahead of a planned invasion of Britain. Although initial damage was inflicted, the failure to neutralise RAF command and control allowed Fighter Command to recover and continue resisting German air attacks.
Asisbiz Kanalkampf Heinkel He 111H bombardier points the way to the target Battle of Britain 1940 01
...would fatally undermine the larger offensive...
Yet again, the results proved uneven.
The radar station at Ventnor was badly damaged, and other sites suffered temporary disruption, but by the following morning all were back in operation.
The airfields came under attack but were not destroyed; even Lympne, not an operational station at all, was mistakenly targeted.
Such blunders in intelligence would fatally undermine the larger offensive.
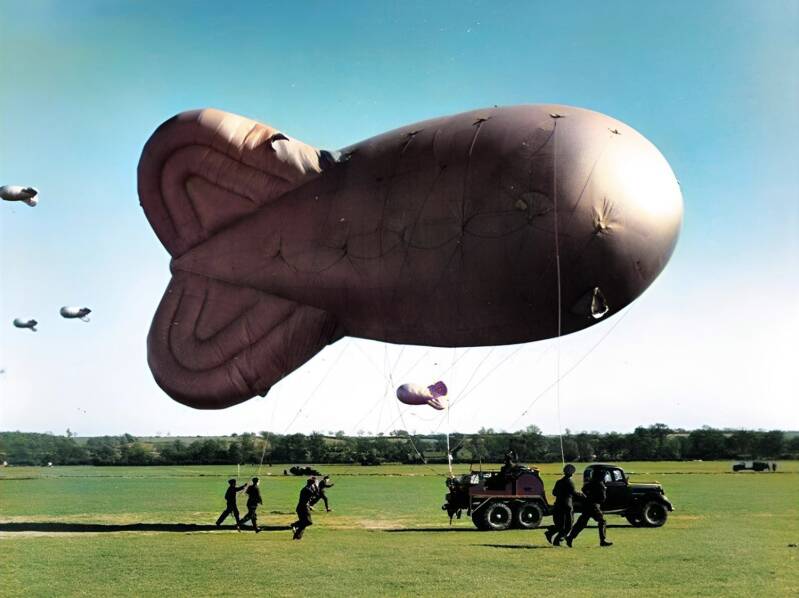
Barrage balloons being used to stop low level attacks Battle of Britain 1940. During the Battle of Britain in 1940, barrage balloons played a key role in defending British cities and airfields from low-level Luftwaffe attacks during Adlerangriff, the German “Eagle Attack” offensive aimed at destroying RAF Fighter Command. Large tethered balloons forced enemy aircraft to fly higher, reducing bombing accuracy and exposing them to anti-aircraft fire. They protected vital targets such as London’s docks, factories, and airfields. While not stopping all raids, barrage balloons disrupted German fighter-bomber tactics, lessening damage during Adlerangriff and contributing to Britain’s resilient air defence network.
Asisbiz Balloons being used to stop low level attacks Battle of Britain 1940-01
...the next and most ambitious stage of the battle...
By 12 August, despite these frustrations, the Luftwaffe believed it was achieving significant results against Fighter Command.
Preparations were finalised for an all-out assault—the operation known as Adlertag, or Eagle Day. German air strength had recovered sufficiently: 71 percent of bombers, 85 percent of Bf 109 units, and 83 percent of Bf 110 units were operational.
With confidence high, the Luftwaffe prepared to launch the next and most ambitious stage of the battle.

Intelligence
Faulty intelligence would lay at the very heart of Adlertag’s eventual failure.
Although the gap between British and German intelligence was not yet overwhelming, the advantage was beginning to tilt decisively in Britain’s favour.
The breaking of the Enigma machine, combined with the Luftwaffe’s poor signals discipline, gave the British unprecedented access to German communications.
The precise impact of Ultra on the Battle of Britain remains debated—official histories long maintained there was no direct influence.
Yet, regardless of that claim, Ultra and the RAF’s Y-Service together built a far more accurate picture of German deployments and intentions than the Luftwaffe ever achieved.
...most dangerous mistakes...

General Joseph "Beppo" Schmid, head of Luftwaffe intelligence in 1940, misjudged RAF strength, underestimated British aircraft production, ignored radar’s significance, and fed Göring flawed assessments that fatally undermined Germany’s Battle of Britain strategy.
At the core of German misjudgement stood Joseph “Beppo” Schmid, commander of the Luftwaffe’s Military Intelligence Branch, Abteilung 5.
His reports throughout this period were riddled with errors.
In July 1940, Schmid both exaggerated the Luftwaffe’s own strength and underestimated the capacity of the RAF.
His most dangerous mistakes concerned radar, airfield identification, and British aircraft production.
Schmid confidently asserted that southern England possessed only a handful of operational airfields.
He claimed Britain could build merely 180–330 fighters per month and predicted that production would soon decline, leaving the RAF unable to withstand a prolonged battle of attrition.
The truth was very different: in July 1940 British factories produced 496 fighters.
...omitted vital details...
Schmid further characterised the RAF as rigid and inflexible, convinced its fighters were tied to home bases and unable to manoeuvre dynamically.
He also omitted vital details about the RAF’s highly effective maintenance and organisation system, which rapidly restored damaged aircraft to service.
Above all, Schmid anticipated only a short campaign and failed completely to mention radar—perhaps his gravest oversight.
The Luftwaffe’s neglect of sustained radar attacks left Britain’s early warning system intact. Radar continued to direct Fighter Command squadrons to intercept raids at precisely the right moments, maximising defensive efficiency.
German intelligence also consistently misidentified airfields, striking stations of RAF Bomber or Coastal Command rather than Fighter Command.
...flawed intelligence...
On Adlertag itself, many of the designated targets, even if destroyed, would have done little to weaken Britain’s fighter defence.
Thus, the Luftwaffe’s grand offensive began from a foundation built on flawed intelligence.
The errors of Schmid and his branch meant that Adlertag’s blows fell wide of the mark, allowing the RAF to fight on with undiminished strength.

RAF Fighter Command
The foundation of Britain’s defence during the Battle of Britain rested on a vast and intricate system of detection, command, and control.
This structure, known as the Dowding System after its architect, Air Chief Marshal Sir Hugh Dowding, was the beating heart of RAF Fighter Command.
Dowding had taken the framework first laid down by Major General E. B. Ashmore in 1917 and transformed it into a modern, efficient, and highly coordinated network.
Central to his design was the adoption of Radio Direction Finding—radar—at his own insistence.
...remarkable speed and efficiency...
By integrating this revolutionary technology with the keen eyes of the Royal Observer Corps and a meticulous system of information processing,
Dowding created a mechanism that allowed Britain to intercept and respond to incoming German attacks with remarkable speed and efficiency.
The system’s official title - RDF, or Radio Direction Finding - was itself a deliberate act of deception, designed to conceal its true purpose from German intelligence should its existence ever be revealed.
...information flowed to the central hub...
The first warnings of incoming air raids came from the Chain Home radar stations, their towers dotted along Britain’s coastline.
These facilities could often detect Luftwaffe formations as they assembled over French and Belgian airfields, long before they crossed the Channel.
Once the German aircraft moved inland, beyond radar range, the Royal Observer Corps picked up the task of tracking them. From there, information flowed to the central hub of Fighter Command at RAF Bentley Priory.
Every new plot was assessed - was it hostile or friendly? - and the findings passed directly to the main operations room, buried deep within an underground bunker.
...streams of incoming reports...
Inside this nerve centre, teams from the Women’s Auxiliary Air Force (WAAF) converted streams of incoming reports into a visual picture of the battle in motion.
Using telephones, they relayed details of enemy positions, then placed colour-coded counters onto a vast map of Britain, spread across a plotting table marked with a British Modified Grid.
Magnetic rakes pushed these counters across the surface, tracking each raid’s direction, altitude, and strength.
The colour of a counter indicated how recent the information was, ensuring that commanders could instantly judge whether they were working with fresh intelligence or older, less reliable data.
...a clear, real-time picture of enemy movements...
This elegantly simple method gave the Fighter Controllers, and Dowding himself, a clear, real-time picture of enemy movements and possible targets.
From this picture, swift and effective decisions could be made. The system did not rely on radar and visual sightings alone.
Supplementing these were intercepts from the Y Service, which monitored German radio transmissions, and intelligence from Bletchley Park’s Ultra decoders, who were piecing together the Luftwaffe’s order of battle.
Combined, these sources gave Fighter Command the ability to anticipate not only where the enemy was, but often what they intended to do.
...control was exercised at a tactical level...
At the same time as the central plot at Bentley Priory, identical streams of information were transmitted to the Group headquarters, where control was exercised at a tactical level.
Each Group operated its own filter room, where data was cross-checked before being passed into their operations room, also housed within fortified underground bunkers.
Here, the map on the plotting table covered the Group’s specific area of responsibility, showing its airfields, bases, and patrol sectors.
Lines of radio and telephone links carried a constant flow of reports to and from Observer Corps posts, naval stations, anti-aircraft batteries, and the sector airfields themselves.

During Adlerangriff, the WAAF plotters and RAF controllers were the unseen backbone of Fighter Command. Plotters at Bentley Priory and group headquarters swiftly transferred radar and observer data onto plotting tables, tracking incoming raids. Controllers then directed squadrons with remarkable precision, ensuring resources were deployed efficiently. Their rapid coordination, supported by telephone and radio networks, allowed Fighter Command to react instantly to Luftwaffe movements. Without these tireless women and controllers, Britain’s air defences would have been fatally compromised.
...meet the enemy with precision timing...
At the heart of each Group’s control room stood the Duty Fighter Controller, the commander’s personal representative.
It was he who decided when and how each raid would be intercepted, deploying squadrons to meet the enemy with precision timing.
Engineers were always close at hand, ready to repair any break in communications within minutes, ensuring that the lifeblood of the system—the unbroken flow of information—was never cut.
Through this vast web of radar, observers, operators, and controllers, the Dowding System transformed scattered reports into coordinated action.
It was the invisible keystone of Britain’s defence, the quiet architecture behind every interception, and the reason Fighter Command could stand its ground against the full force of the Luftwaffe.

13 August - Adlertag
On Tuesday 13th August 1940, the Luftwaffe launched its long-promised assault on Britain. Adlertag (Eagle Day) was intended as the decisive opening strike that would cripple Fighter Command and pave the way for invasion.
Yet poor intelligence, confused orders, and British resilience turned this planned triumph into a day of costly frustration.
The day before, 12 August, had been billed as a rehearsal. Radar stations at Pevensey, Rye, Dover, and Ventnor were struck, along with airfields at Hawkinge, Lympne, and Manston. Portsmouth docks were also bombed.
Damage was limited: only Ventnor was briefly disabled, while other stations were back in service within hours.
Airfields sustained damage but remained operational, and German intelligence mistakenly identified Lympne as a major fighter base. Intended to blind and weaken the RAF, the raids instead underscored the resilience of Britain’s radar network and repair system.

Adlertag (Eagle Day) - 13th August 1940: On Adlertag, the Luftwaffe launched a massive, coordinated assault to cripple RAF air power. Striking airfields, radar stations, and infrastructure across southern England, they deployed hundreds of bombers and fighters. Poor weather, communication failures, and strong RAF resistance blunted the offensive, resulting in heavy German losses.
...were mauled by Hurricanes and Spitfires...
Adlertag itself began in confusion. Poor weather forced a postponement, but the recall orders failed to reach all units.
At dawn, Dorniers of KG 2 bombed Eastchurch unescorted, devastating hangars, stores, and aircraft—but Eastchurch was a Coastal Command base, not part of Fighter Command.
On their return, the Dorniers were mauled by Hurricanes and Spitfires, losing five aircraft.
Other early raids against Farnborough and Odiham achieved little, with German crews greatly exaggerating their success.

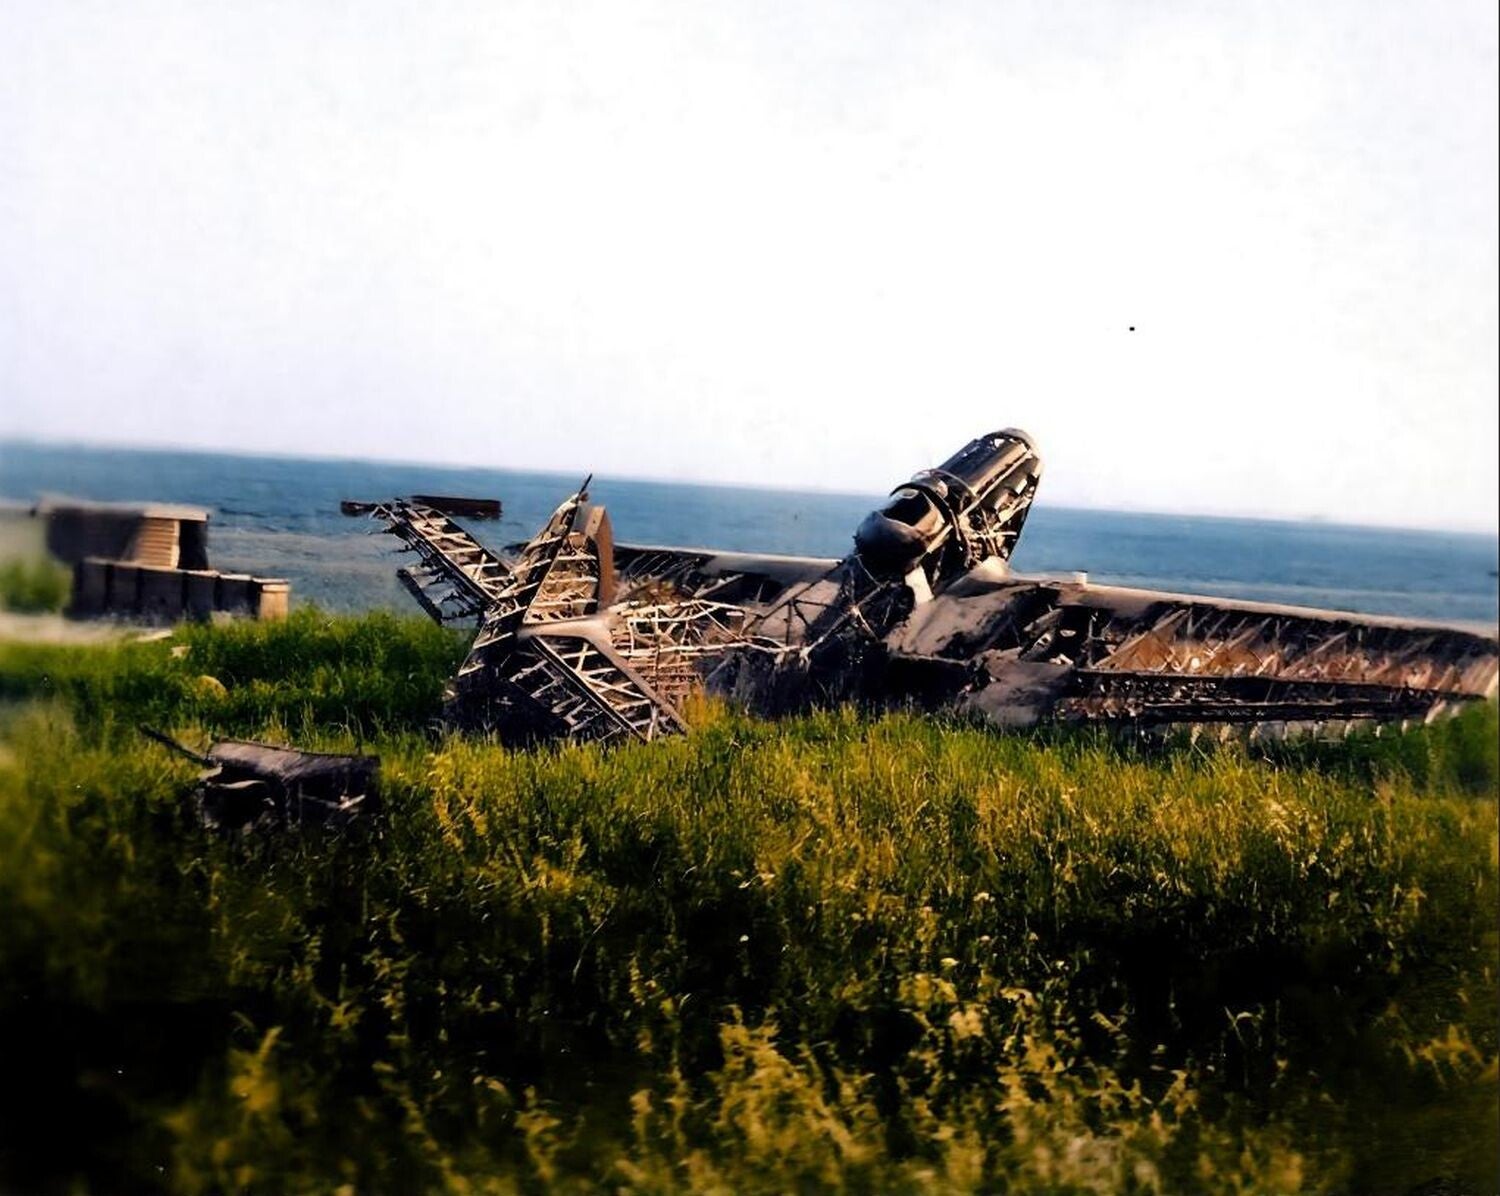
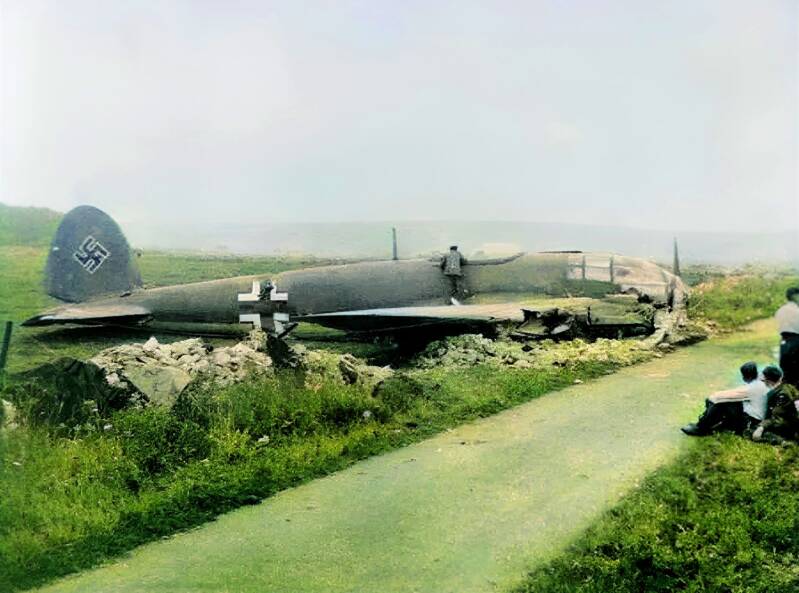
The wreckage of Dornier Do 17Z ‘U5 + DS’ of 8 Staffel./Kampfgeschwader 2 at Seasalter, near Whitstable in Kent. The aircraft was attacked and shot down by Hurricanes of Nos. 111 and 151 Squadrons on 13th August 1940. The flight engineer baled out wounded and was captured. The rest of the crew were killed.
Tuesday 13 August 1940 | The Battle of Britain Historical Timeline
...inflated claims masked the limited damage inflicted...
As morning advanced, coordination faltered. Units of Luftflotte 3 attacked Portland Harbour and Bristol docks, while others bombed minor or misidentified airfields.
Communication failures left formations flying unescorted, and inflated claims masked the limited damage inflicted.
At Portland, a “freie Jagd” of Bf 110s blundered into Hurricanes, losing six aircraft in minutes.
By afternoon, Göring pressed forward. Large raids crossed the Channel aimed at RAF bases and industrial sites.
Ju 87s of StG 77 attacked Detling with devastating local effect, killing 67 personnel and destroying 22 aircraft—but again, the station belonged to Coastal Command, not Fighter Command.
At Southampton, bombs caused fires and damaged infrastructure, while Eastchurch and Rochester were struck again. RAF squadrons scrambled in strength, exacting losses from the attackers.
...a bitter blow...
While the Luftwaffe pressed its daylight offensive, RAF Bomber Command suffered disaster.
Twelve Blenheims sent against Aalborg in Denmark lost eleven aircraft, with only one returning - a bitter blow that darkened the RAF’s own tally for the day.
As night fell, German operations shifted to psychological warfare.
Nine He 111s of Kampfgruppe 100 attempted to bomb the Spitfire factory at Castle Bromwich, but only four crews found the target, causing minor damage.
Other raids struck Belfast, Glasgow, and cities across Britain, destroying five Short Stirlings at Queen’s Island but achieving little else.
Propaganda leaflets, parachutes, and radios were dropped over the Midlands and Scotland to suggest an imminent invasion.
Scattered raids stretched civil defences, but physical damage was limited.

Dornier Do 17Z ‘U5 + KA’ of Stab.Staffel./Kampfgeschwader 2 was shot down over Barham in Kent on 13 August 1940 and ended up crashing onto the Canterbury-Folkestone railway line at Pherbec Bridge. The Dornier bomber crews experienced a brutal initiation on Adlertag, 13th August 13, 1940, the planned start of the main German air offensive. They were tasked with penetrating deep inland to strike RAF airfields, but poor weather and coordination failures led to heavy losses. Flying under intense pressure, the slow, straight-winged Do 17s were vulnerable to fast British fighters. Facing concentrated intercepts from RAF Hurricanes and Spitfires, many Dorniers were shot down, forcing the Luftwaffe to quickly review its tactics for bomber protection.
Tuesday 13 August 1940 | The Battle of Britain Historical Timeline
...it revealed the Luftwaffe’s shortcomings...
By day’s end, the Luftwaffe had flown almost 1,500 sorties against 727 by the RAF. German losses amounted to around 45 aircraft, compared with 15 British fighters.
Severe damage was inflicted at Detling and Eastchurch, but Fighter Command’s vital sector stations remained untouched.
German crews claimed thirty fighters destroyed, but RAF records confirmed only half that number.
Among the day’s losses was Luftwaffe ace Oberleutnant Paul Temme, while British pilots such as Adolph “Sailor” Malan led spirited defences. Adlertag had promised a crushing blow.
Instead, it revealed the Luftwaffe’s shortcomings in intelligence, communication, and coordination. Fighter Command, bloodied but intact, emerged with its defensive system unbroken.
For the Luftwaffe, Eagle Day was not the decisive victory Göring envisaged, but the beginning of a long, grinding battle Britain was prepared to fight.

Messerschmitt Bf 109E-1 of Oberleutnant Paul Temme, Gruppe Adjutant of I/ JG 2 ‘Richtofen’, which crashed near Shoreham aerodrome in Sussex on 13th August 1940. For the Messerschmitt Bf 109 pilots on Adlertag, the day was defined by aggressive dogfighting and the limitations of range. Their primary role was to provide close escort for the slow Dorniers and Ju 88s, which tethered them to the bombers' slower pace. While skilled Luftwaffe aces often outfought their RAF counterparts in skirmishes, the distance to inland targets severely limited the 109s' fuel, forcing quick retreats and leaving the bombers vulnerable during the critical last miles over Britain.
IWM (HU 67701, HU 88398, HU 76146)
Tuesday 13 August 1940 | The Battle of Britain Historical Timeline

14th August
On Wednesday 14 August 1940, poor visibility and heavy cloud curtailed large-scale operations, but the Luftwaffe pressed ahead with scattered raids across southern and western England.
Though less intense than Adlertag, these strikes tested Fighter Command and inflicted local damage. At 11:40 hours, radar picked up a major formation over Calais.
Around eighty Ju 87s from II./StG 1 and IV./LG 1, escorted by 100 Bf 109s, crossed the Kent coast. Hurricanes and Spitfires intercepted, losing three fighters while the Germans lost one Bf 109, its pilot captured near Dover.
A crashed Heinkel He IIIP, 1G+NT, of III/KG 27, shot down by Blue Section of No. 92 Squadron RAF at 6 pm on 14 August 1940, lying by the side of the road at Charterhouse, Somerset. Note the machine gun projecting from the starboard side of the fuselage as protection from beam attacks.
Wednesday 14 August 1940 | The Battle of Britain Historical Timeline
...fought back fiercely...
The Stukas attacked harbour targets, sinking the Goodwin Lightship and destroying barrage balloons.
Minutes later, sixteen Bf 110s of Erprobungsgruppe 210 bombed RAF Manston, destroying hangars, cratering the runway, and wrecking aircraft on the ground.
Anti-aircraft gunners fought back fiercely, downing two of the attackers within the airfield perimeter.
Despite damage, Manston remained operational.
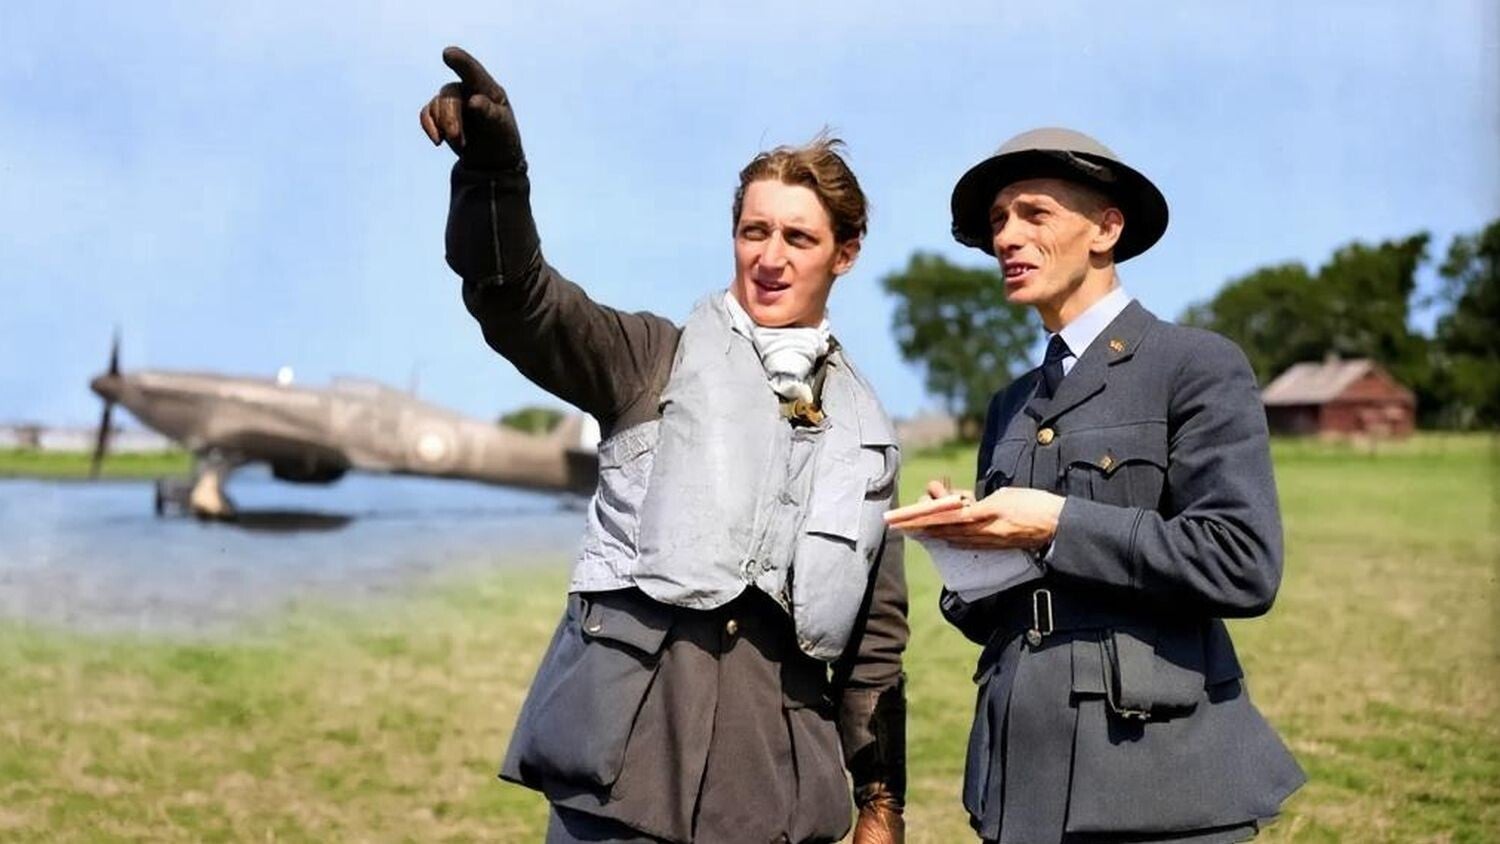
Flying Officer Anthony Eyre, DFC, of ‘B’ Flight, No. 615 (County of Surrey) Squadron, Royal Auxiliary Air Force, is debriefed by his squadron’s Intelligence Officer. On 14 August 1940, he claimed a Ju 87 destroyed and shared in the destruction of another; the following day, he shared in the destruction of a Messerschmitt Bf 109.
Wednesday 14 August 1940 | The Battle of Britain Historical Timeline
...achieving temporary disruption...
In the afternoon, Do 17s struck Pevensey radar station, achieving temporary disruption.
Further raids targeted Middle Wallop, hit four times between 17:07 and 19:35, killing three airmen and a civilian.
Spitfires of No. 609 Squadron intercepted, downing a Ju 88 and a He 111, the latter carrying Oberst Alois Stöckl, Kommodore of KG 55. RAF Andover also suffered, while Southampton’s rail network was disrupted.
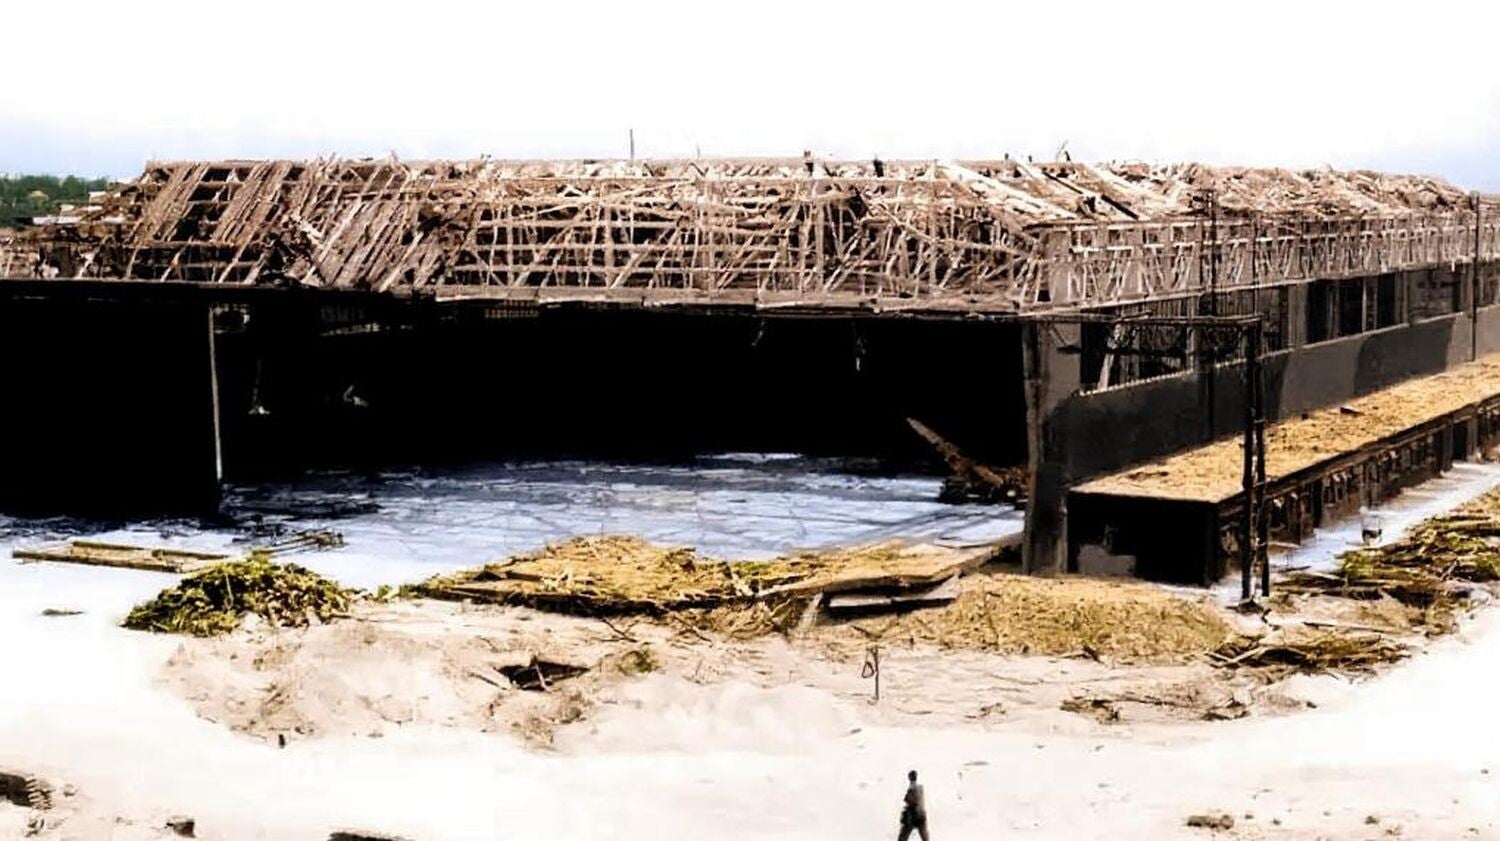
A wrecked hanger at RAF Middle Wallop after a German raid on 14 August 1940.
Wednesday 14 August 1940 | The Battle of Britain Historical Timeline
...defences again absorbed the blows...
In the west, He 111s attacked the Bristol Aeroplane Company at Filton but were intercepted by No. 92 Squadron, three bombers destroyed.
Smaller raids struck Whitchurch Airport, Weston-super-Mare, and RAF Sealand, where a He 111 was brought down by training unit pilots.
Night operations were scattered and caused little damage. Berlin itself endured an air raid alarm, though no bombs fell.
The day lacked Eagle Day’s intensity, but Britain’s defences again absorbed the blows and remained unbroken.
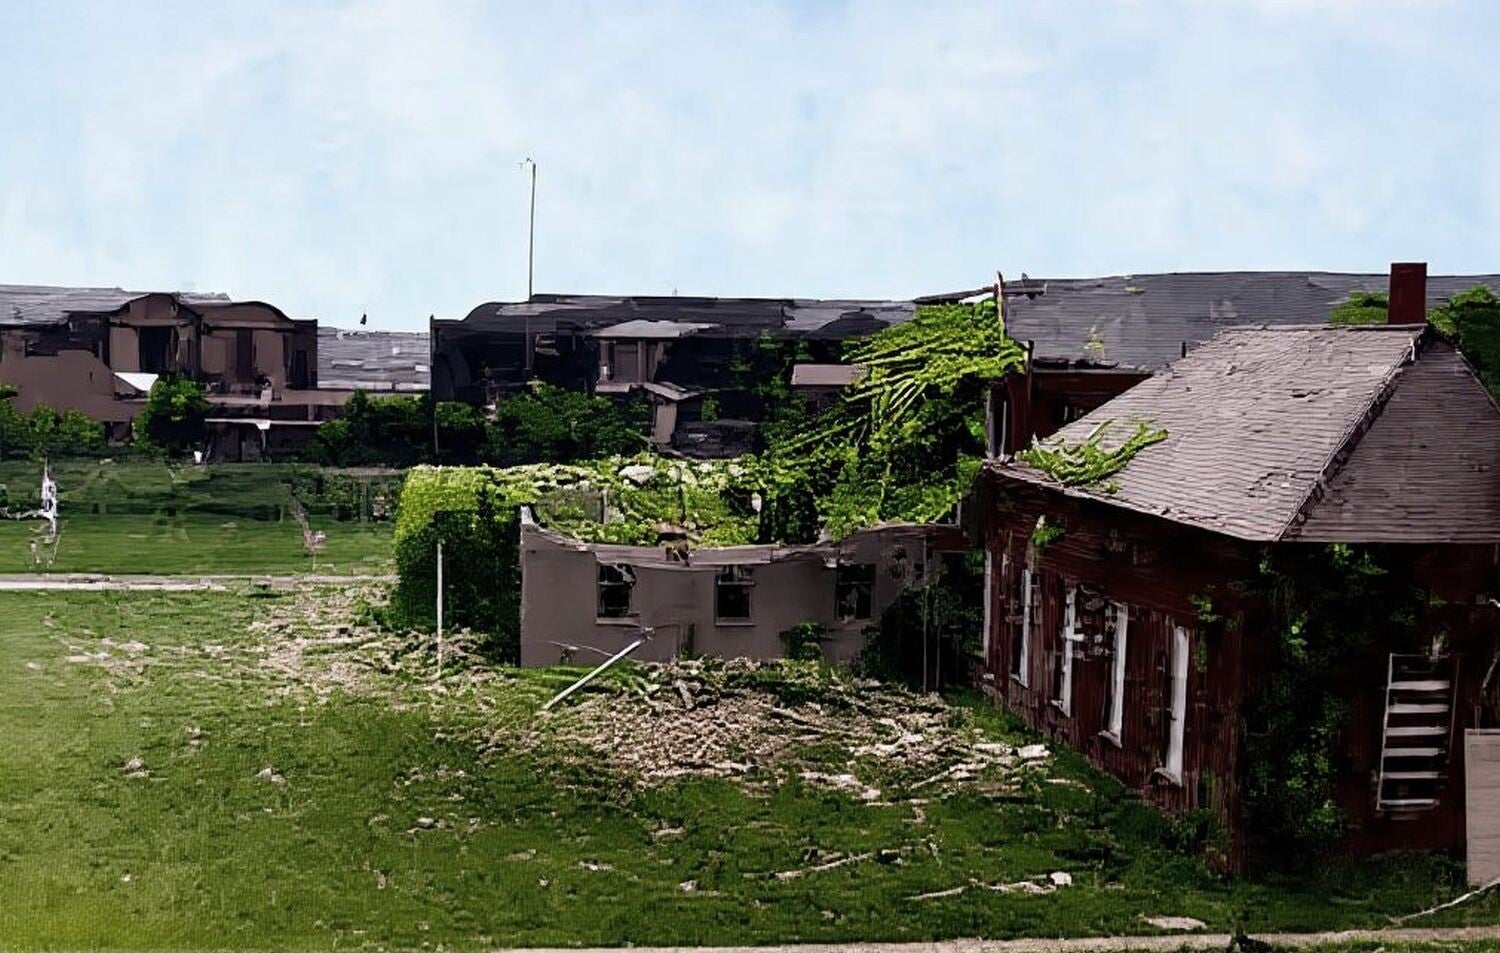
The Sergeants’ Mess at RAF Sealand after a Luftwaffe raid on 14 August 1940.
Wednesday 14 August 1940 | The Battle of Britain Historical Timeline

15th August - The Greatest Day
Thursday, 15 August 1940, marked the Luftwaffe’s most ambitious assault of the Battle of Britain.
For the first time, all three German air fleets—Luftflotten 2, 3, and 5—were thrown into a combined offensive.
Nearly 1,800 sorties were flown, more than 500 by bombers. Göring’s directive was clear: destroy the RAF in the air and on the ground, cripple its factories, silence its airfields.
The attacks inflicted damage, yet the price was heavy—seventy-six aircraft lost in a single day, including twenty-six of the prized Bf 110s. Fighter Command endured, bloodied but unbroken.


On 15 August 1940, Luftflotte 2 and Luftflotte 3 spearheaded the Luftwaffe’s main offensive in southern England. Luftflotte 2, under Kesselring, directed mass raids against Kent, Sussex, and the Thames Estuary, hammering airfields like Hawkinge, Lympne, and Biggin Hill. Simultaneously, Luftflotte 3, led by Sperrle, struck Hampshire, Wiltshire, and Dorset, with attacks on Middle Wallop, Worthy Down, and Portland. Despite heavy bombing and widespread disruption, RAF squadrons fought fiercely, inflicting punishing losses that blunted the German advance.
http://www.arborfield-september49ers.co.uk/
...an omen of the battles to come...
The day opened at 04:50 when a Dornier Do 17, sent to photograph southern airfields, was intercepted south of Ventnor by Spitfires of No. 152 Squadron.
It was shot down before completing its task—an omen of the battles to come.
At mid-morning, forty-five Ju 87 Stukas, escorted by JG 26 fighters, dived on Hawkinge and Lympne. Hurricanes of No. 501 Squadron and Spitfires of No. 54 Squadron intercepted, downing several attackers, yet the bombers pressed through.
Lympne was wrecked—buildings destroyed, power and telephone lines cut, the station unusable for forty-eight hours.
Hawkinge was hit but quickly recovered. Radar coverage briefly faltered as power lines to Rye, Dover, and Foreness stations were severed.
...defensive circles of Bf 110s were picked apart...
Around midday, Luftflotte 5 struck from Norway in its only major daylight raid of the battle.
Sixty-five He 111s and thirty-four Bf 110s advanced on northern airfields, led by Hauptmann Werner Restemeyer.
But British radar detected them early, and No. 13 Group scrambled Spitfires and Hurricanes from Acklington, Usworth, and Tyneside.
The formation broke apart under pressure. Bombs were jettisoned into the sea, while defensive circles of Bf 110s were picked apart.
Restemeyer’s aircraft exploded when its belly tank ignited, plunging into the North Sea. Eight Heinkels and six Bf 110s were destroyed—losses so severe that Luftflotte 5 abandoned daylight operations entirely.

Hawker Hurricanes (P3059 and P3208) of No. 501 Squadron take off from RAF Hawkinge on a squadron patrol, 15 August 1940. Three days later, both these aircraft would be shot down and destroyed in combat between Canterbury and Whitstable. Hawker Hurricanes formed the backbone of Fighter Command’s defence. Heavily engaged across both northern and southern England, they bore the brunt of Luftwaffe attacks. In fierce dogfights, Hurricanes intercepted bomber formations, often outnumbered yet inflicting heavy losses. From Kent to Tyneside, they disrupted raids, destroying Heinkels and Bf 110s at great cost. Though many were lost, their rugged design, firepower, and the skill of their pilots proved vital in preserving Britain’s aerial shield.
https://battleofbritain1940.com/entry/thursday-15-august-1940/
...demolishing workshops and hangars...
At 13:30, fifty Ju 88s of KG 30 bombed RAF Driffield despite interceptions by Hurricanes, Spitfires, and Defiants.
Four hangars and three buildings were destroyed, seven Whitleys lost, six RAF personnel killed. Anti-aircraft fire and fighters downed six of the bombers.
An hour later, eighty-eight Do 17s of KG 3, heavily escorted, crossed from Belgium. Despite fierce resistance, many broke through.
The Short Brothers factory at Rochester was hit hard - six Stirling bombers destroyed, production halted.
At Martlesham Heath, Bf 110s of Erprobungsgruppe 210 struck low, demolishing workshops and hangars.
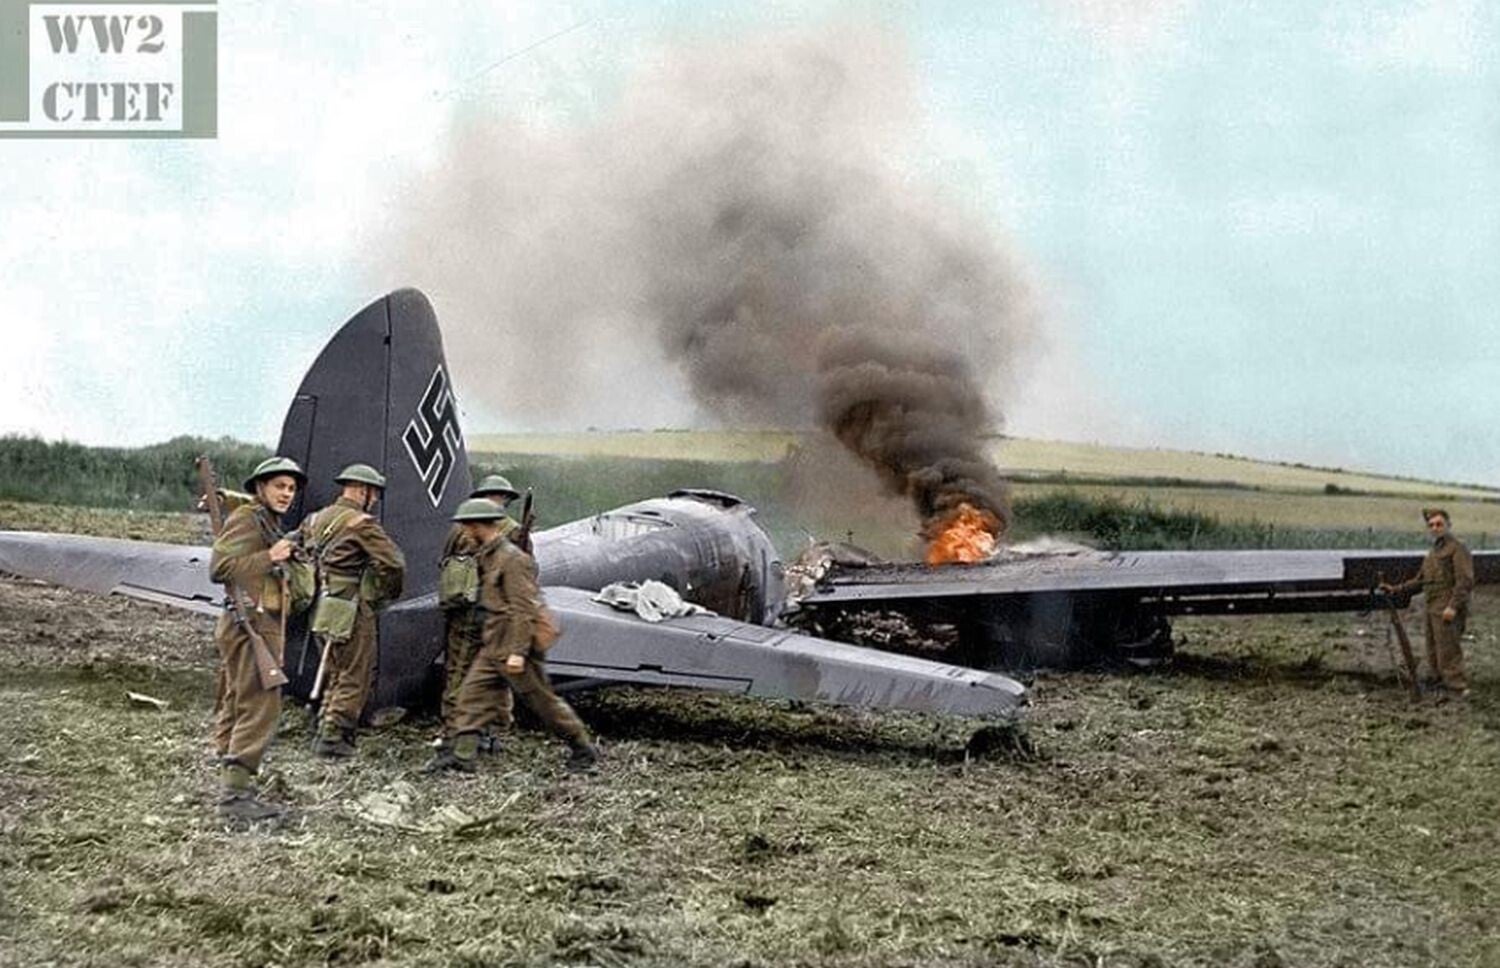
British troops guard the burning remains of a Junkers Ju 88 of the KG 30, one of seven aircraft shot down during attacks on airfields in Yorkshire on 15th August 1940. Spitfires of No. 616 Squadron and Hurricanes of No. 73 Squadron intercepted the enemy formation as it approached the coast near Scarborough.
...they paid dearly...
At 17:00, Luftflotte 3 sent 250 aircraft across Hampshire and Wiltshire.
Middle Wallop was lightly hit, while Worthy Down and Portland suffered only minor damage.
Eleven RAF squadrons joined battle. Twenty-five German aircraft were destroyed against sixteen RAF fighters, including three - possibly four - 109's and 110s claimed in quick succession by Belgian pilot J. Phillipart of No. 213 Squadron.
At 18:50, Croydon endured its first heavy raid. Bf 110 fighter-bombers of Erprobungsgruppe 210, their escort peeled away, struck factories and workshops, causing over eighty casualties and wrecking training aircraft.
Yet they paid dearly—six Bf 110s and a Bf 109 were shot down by Nos. 111 and 32 Squadrons.

Belgian RAF pilot Jacques Philippart who destroyed several German aircraft on the 15th August.

Messerschmitt Bf 110 D-0/B (S9+CK), W.Nr. 3341, of 2.Staffel/Erprobungsgruppe 210, force-landed at Hawkhurst in Kent following the late-afternoon raid on Croydon airfield on 15 August 1940. The starboard rudder controls had been shot through during the action, leading pilot Oberleutnant Alfred Habisch to believe the aircraft might become uncontrollable before reaching the French coast. Choosing not to risk the lives of himself or his rear gunner/radio operator, Unteroffizier Ernst Elfner, he made the decision to put the aircraft down safely in England. Both men were taken prisoner.
https://battleofbritain1940.com/entry/thursday-15-august-1940/
...suffered its heaviest losses...
Scattered raids continued into the night, reaching as far as Liverpool and Birmingham, but with little effect.
The true battle had been fought in daylight.
By nightfall, the Luftwaffe had suffered its heaviest losses of the campaign so far.
The RAF’s southern airfields were battered but operational; radar remained intact.
In the north, Luftflotte 5’s defeat was decisive. Göring’s grand plan to crush Fighter Command in a single coordinated blow had failed.
...bloodied, but unbroken...
Major Adolf Galland later recalled:
“We saw one comrade after the other vanish from our ranks… Not a day passed without a place remaining empty at the mess table.”
The Greatest Day proved that the RAF could withstand the combined weight of the Luftwaffe. Fighter Command stood bloodied, but unbroken.

A Junkers Ju 87B (L1 + EV) of 10 Staffel./Lehrgeschwader 1 lies wrecked in a garden at 78-82 Shorncliffe Crescent in Folkestone. This aircraft was on a bombing sortie over the Channel on 15 August 1940 when it was hit by AA fire and Hurricanes from No. 501 Squadron. Flying at low level, the Stuka hit high tension cables causing it to crash into houses and burn out, killing both crew members (pilot Uffz Franz-Heinrich Kraus and gunner/observer Uffz Herman Weber).
https://battleofbritain1940.com/entry/thursday-15-august-1940/
16th August
The morning air was warm and still, with haze drifting over the Channel—an ominous calm before one of the fiercest days of aerial warfare yet.
By midday, the Luftwaffe launched a series of coordinated strikes that tested Fighter Command to its breaking point. At 12:00 hours, radar picked up large formations heading for Kent.
Around 100 Dornier Do 17s of KG 2, escorted by Bf 109s from JG 51, targeted the Thames Estuary and inland airfields like Biggin Hill and Kenley. RAF squadrons scrambled to intercept.
In the chaos, Flight Lieutenant Henry Ferris collided with a Dornier - both aircraft were lost.
Squadron Leader Rodney Wilkinson’s Spitfire collided with a Bf 109 flown by Unteroffizier Ernst Buder; Buder bailed out and was captured, but Wilkinson was killed.
...skies over Kent erupted...
The skies over Kent erupted as RAF fighters clashed with bombers and their escorts. Ten German aircraft were downed, but six RAF fighters were lost. Hauptmann Walter Oesau of JG 51 claimed two Spitfires, raising his tally to eighteen.
On the ground, West Malling was bombed again, forcing its closure until 20 August.
Civilian casualties mounted: Tilbury docks were hit, and at Northfleet, Bowater’s Paper Mills suffered a direct strike—25 killed, 32 injured.
At 13:00, a new wave crossed from Cherbourg—150 aircraft including Ju 87 Stukas of StG 2, Ju 88s of KG 54, and heavy fighter escort.
Over Nab Tower, the formation split: Ventnor radar, Portsmouth, Gosport, and Tangmere were all targeted.
RAF Hurricanes and Spitfires engaged fiercely. Though RAF pilots claimed 17 Stukas, Luftwaffe records confirmed nine losses.
...he survived and was awarded the Victoria Cross...
Tangmere was devastated. Dive-bombers destroyed aircraft and infrastructure; twelve personnel were killed.
Pilot Officer Billy Fiske of No. 601 Squadron, an American volunteer, crash-landed his burning Hurricane and was pulled from the wreckage.
He died the next day, becoming the first American combat fatality in RAF service.
At 13:10, Ju 88s struck Tangmere again with precision, destroying more aircraft and buildings.
Second Lieutenant E.P. Griffin of the Royal Engineers downed a Bf 110 with a Lewis gun. Gosport and Lee-on-Solent were also bombed—dozens of aircraft wrecked, 21 killed.
Ventnor radar was hit once more, silencing it until late September.
At 13:45, Flight Lieutenant James Nicholson of No. 249 Squadron was wounded and his cockpit ablaze, yet he pressed home an attack before bailing out.
Mistakenly shot by a Home Guard volunteer while descending, he survived and was awarded the Victoria Cross—the only Fighter Command pilot to receive it during the war.

Billy Fiske was a former Olympic bobsled champion and financier who joined the RAF as a volunteer before the U.S. entered the war. Flying Hurricanes with No. 601 Squadron, he was mortally wounded during a raid on Tangmere on 16 August 1940. He became the first American combat fatality of the Battle of Britain.
https://masonandsons.com/blogs/the-periodical/billy-fiske-the-american-who-died-for-england
...Never in the field of human conflict was so much owed by so many to so few...
Evening raids continued. Heinkels struck Heathrow, Wimbledon, Essex, and Eastbourne. Farnborough and Harwell were bombed, and Brize Norton was hit again.
Manston was dive-bombed. By nightfall, scattered attacks reached Brough, Filton, Cardiff, and South Wales.
Fighter Command lost 23 aircraft and nine pilots.
The Luftwaffe lost 44 aircraft and 55 aircrew.
Churchill, observing from RAF Uxbridge, later immortalised the day with his words: “Never in the field of human conflict was so much owed by so many to so few.”

17th August
After five days of relentless combat, the skies over southern England fell quiet on 17 August. Fighter Command remained on high alert, but radar screens stayed still.
Squadron Leader Mike Crossley of No. 32 Squadron called it “an amazing, heavenly day”—free from alerts, scrambles, and dogfights. The lull was genuine.
German bomber units, especially KG 3, were exhausted.
Morale was fraying.
Oberfeldwebel Manfred Langer recalled the futility of repeated missions with high losses and little impact: “Man is not a machine, though our commanders thought differently.”
...redeployed to strengthen southern defences...
Fighter Command used the pause to regroup. Repairs resumed at Biggin Hill, Hornchurch, and Kenley.
Reinforcements arrived: No. 310 (Czechoslovak) Squadron at Duxford, No. 1 (Canadian) Squadron joined the fight, and others redeployed to strengthen southern defences.
Luftwaffe activity was limited to scattered reconnaissance. Aircraft shadowed convoys along the East Coast and probed southern airfields.
A lone German plane dropped propaganda leaflets over Welshpool.
Another was downed by the Royal Navy in the Channel.
Despite claims by Luftwaffe aces—including Oesau, Tietzen, and Bär—RAF records show no fighter losses.
...offered no true reprieve...
Nightfall brought renewed action. Small formations crossed the Thames Estuary and Norfolk coast. Between 23:00 and 03:00, bombers struck Birmingham, Coventry, Liverpool, and Avonmouth.
A Ju 88 was intercepted and destroyed off Spurn Head by No. 29 Squadron. X-Gerät-guided raids targeted Castle Bromwich, but most bombs missed.
One Heinkel crashed at Dinard; its crew survived.
Though quieter than previous days, 17 August offered no true reprieve. Both sides regrouped, recalibrated, and prepared for the next wave.
The RAF repaired and reinforced.
The Luftwaffe, strained and frustrated, began to feel the limits of its campaign.

18th August
On Sunday, August 18, 1940, the skies over southern England erupted in a maelstrom of violence, a day that would become known as "The Hardest Day" of the Battle of Britain.
The title was earned not from a single, epic dogfight, but from the brutal intensity of the Luftwaffe's operations and the staggering losses on both sides.
Driven by Reichsmarschall Göring’s directive, Luftflotten 2 and 3 launched a massive, coordinated assault aimed at crippling RAF Fighter Command's airfields and clearing the way for a cross-Channel invasion.
Over 850 sorties were flown, targeting critical airfields and radar stations, yet by nightfall, not a single sector station had been knocked out.
The cost to the Luftwaffe was immense: 67 aircraft destroyed and 97 airmen killed or captured.
...a systematic effort to test British defences...
The first blood of the day was drawn in the pre-dawn hours.
A German Junkers Ju 88 from NJG 1 was intercepted and shot down by a British Bristol Blenheim night fighter, its three crewmen becoming the first casualties of a day destined for carnage.
As daylight broke, German reconnaissance intensified.
A Messerschmitt Bf 110 was shot down at an altitude of 31,000 feet by Spitfires from No. 66 Squadron, the first daylight loss for the Luftwaffe that day and the highest recorded interception of the campaign.
These probing flights, operating from 20,000 to 25,000 feet, were a systematic effort to test British defences and pinpoint targets for the day's main assaults, which were already forming up on airfields across northern France.
...most ferocious assault...
The most ferocious assault was directed at RAF Kenley, a vital sector airfield.
The Luftwaffe’s plan was a complex, three-phase strike by Kampfgeschwader 76 (KG 76), involving dive-bombers, medium-level bombers, and a daring low-level surprise attack.
However, war rarely goes to plan.
Thick cloud over France delayed the main formations, and Hauptmann Joachim Roth’s low-level group of nine Do 17s, unaware of the delays, arrived first and alone.
As Roth’s Dorniers swept in at treetop level, they were met by a hail of fire from No. 111 Squadron’s Hurricanes and ground defences.
Though they pressed home their attack, destroying three hangars and several aircraft on the ground, the cost was severe.
...a daring head-on attack that shattered the German formation...
Five of the nine bombers were lost, and only one returned undamaged.
The attack claimed the life of Flight Lieutenant S.D.P. Connors of No. 111 Squadron, whose Hurricane was hit by anti-aircraft fire.
Ten minutes later, the main bomber formations arrived, flying into skies already thick with smoke and flak.
They were immediately engaged by squadrons like No. 32 and No. 64. Squadron Leader Michael Crossley of No. 32 Squadron led a daring head-on attack that shattered the German formation.
The Luftwaffe’s escort fighters were also caught in a melee, and while they inflicted losses on the RAF, they also took heavy casualties.
The final German bomber wave, a group of Ju 88s, found the airfield so obscured by smoke that they diverted to RAF West Malling.
Despite the damage, Kenley’s operations room remained intact and flying operations resumed later the same day.
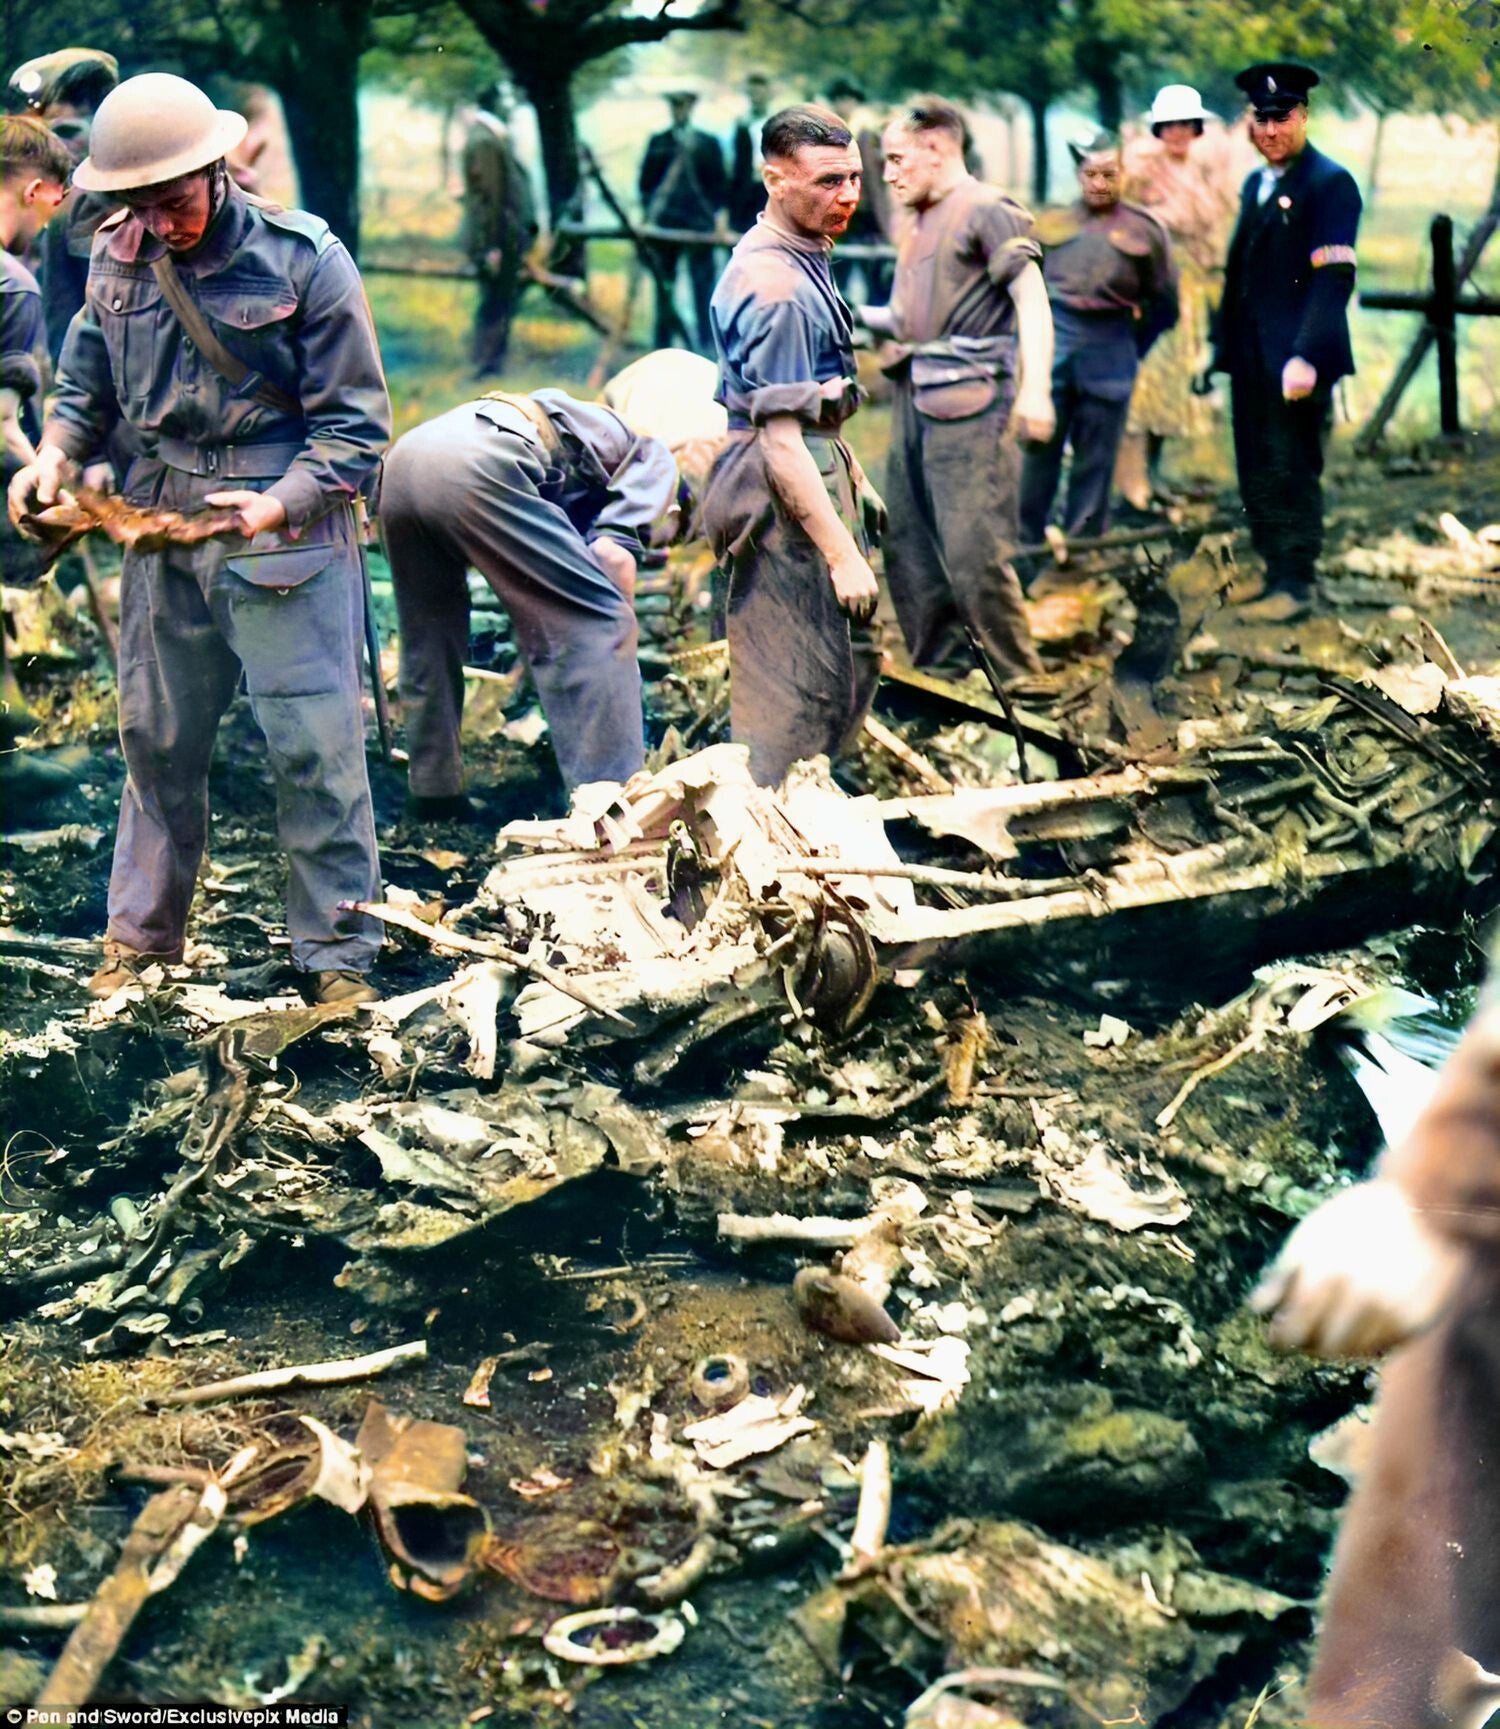
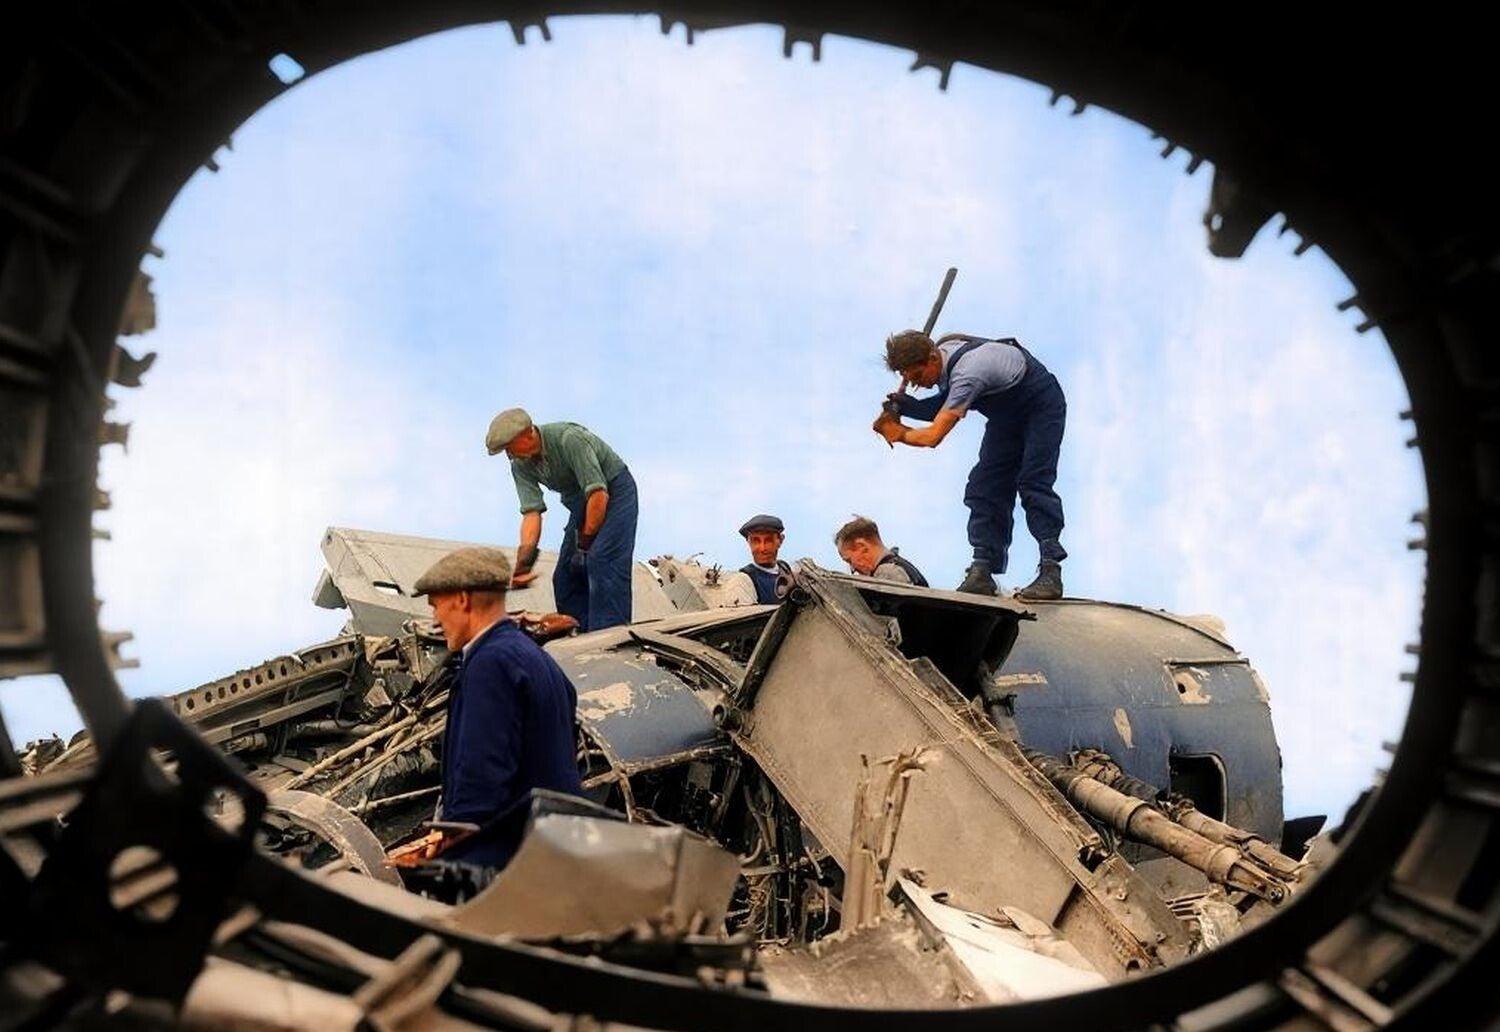
Soldiers pick amongst all that is left of a Junkers 88 aircraft, shot down at Church Farm, Aylesford, Kent on August 18 1940. The plane has been comprehensively smashed to pieces with only the main wing-spar identifiable in this photo.
Photos reveal clean-up operation in Blitz-struck Britain | Daily Mail Online
...particularly heavy casualties...
At 14:00, the Luftwaffe launched its most ambitious attack of the day, targeting coastal airfields and the Poling radar station.
The assault was led by over 100 vulnerable Ju 87 Stuka dive-bombers.
They struck RAF Ford, RAF Thorney Island, and RNAS Gosport, inflicting significant damage to facilities and aircraft on the ground, with particularly heavy casualties at Ford.
Simultaneously, a group of Stukas attacked the Poling radar station, destroying two transmission pylons and knocking the site out of commission.
The Stukas’ lack of close fighter escort made them easy targets for the RAF.
Hurricanes from Nos. 43 and 601 Squadrons tore into the formations, shooting down ten of the 28 bombers from one group alone.
This brutal toll exposed the Ju 87’s vulnerability, and August 18, 1940, marked its last major appearance in a daylight raid over Britain.
...a fierce dogfight broke out...
As the day waned, the Luftwaffe mounted its final major assault, targeting North Weald and Hornchurch with a force of 250 aircraft.
The Heinkel bombers headed for North Weald but were forced to turn back due to low cloud cover.
Their retreat was met by a determined RAF response, which inflicted further losses.
Over Hornchurch, a fierce dogfight broke out between RAF Hurricanes and German Bf 109s, with both sides taking heavy casualties, including the death of Horst Tietzen, a 20-victory German ace.
...marked a turning point...
Sunday, August 18, 1940, was the costliest day of the campaign for the Luftwaffe.
They failed to put any RAF sector station out of action, a clear sign of Fighter Command’s resilience.
The day marked a turning point, exposing the Ju 87’s weakness and the limits of the Luftwaffe’s ability to coordinate large, multi-phase assaults.
Fighter Command had endured its hardest day, taking a brutal pounding but remaining in the fight.

19th August
Monday the 19th August 1940, marked a pivotal day of strategic change for the Luftwaffe.
Following the devastating losses of "The Hardest Day," a frustrated Reichsmarschall Hermann Göring convened a critical conference at Karinhall.
His top priority was a sweeping reassessment of tactics to reduce bomber losses and preserve his force.
...a humiliating demotion...
In a controversial move, Göring ordered the immediate withdrawal of the vulnerable Junkers Ju 87 Stuka dive-bombers from frontline operations, a humiliating demotion for a weapon that had dominated earlier campaigns.
More controversially, he mandated that the agile Bf 109 fighters abandon their "free-hunting" tactics and act as close escorts for slower bomber streams, a decision that drew immediate scorn from the fighter pilots.
To improve leadership, Göring also purged older, less effective commanders, replacing them with a new generation of younger, more aggressive officers.
...sporadic and scattered...
While these strategic changes were being enacted, the day's combat was sporadic and scattered.
The morning saw only isolated reconnaissance flights, but the afternoon brought a series of small, ineffectual raids across southern and eastern England.
The most significant attack targeted oil storage tanks near Pembroke Docks, destroying ten tanks and causing a major fuel loss.
Elsewhere, bombs fell on airfields and civilian areas, including Chelmsford and Honington, causing casualties and limited damage.
RAF squadrons, though not facing a major assault, were active and successful in intercepting many of the raids.
...a new, more precise era of night bombing...
As night fell, the war entered a new phase.
Instead of mass raids, dozens of single German aircraft conducted uncoordinated attacks, dropping bombs randomly.
However, a technologically significant raid was conducted by KGr 100, which used the advanced X-Verfahren radio navigation system for a precision attack on the Bristol Aeroplane Company.
This marked a new, more precise era of night bombing and a clear shift in Luftwaffe strategy, proving that even a quiet day on the surface could be a turning point in the air war.
20th August
Tuesday, August 20, 1940, brought a welcome respite from the brutal air battles of the preceding days.
Under a blanket of overcast skies, Luftwaffe operations were significantly reduced, constrained by both operational fatigue and deteriorating weather.
However, this lull was deceptive, with isolated raids and reconnaissance flights still keeping Fighter Command on constant alert.
...a few dramatic moments...
Despite the quiet, a few dramatic moments punctuated the day.
A sharp strike by Bf 110s from Erprobungsgruppe 210 on Martlesham Heath met with fierce resistance, and a Dornier Do 17 patrol over the North Sea was intercepted by No. 242 Squadron, costing the life of a young Hurricane pilot, Midshipman P.J. Patterson.
In a more bizarre event, a Focke-Wulf Condor on a reconnaissance mission crashed in neutral Ireland, becoming the first German airmen interned by Irish authorities.
The afternoon also saw a significant development over Kent, where a pilot named Leutnant Heinz Bär of JG 51 claimed his fifth aerial victory, earning the prestigious status of "ace."
...the nation's immense debt...
Later in the day, a new force entered the fray. No. 302 (Polish) Squadron, newly declared operational, flew its first combat sortie over the Yorkshire coast, successfully shooting down a Ju 88 and capturing its crew.
As the pilots fought their daily battles, Prime Minister Winston Churchill stood before Parliament. Reflecting the nation's immense debt to the men of Fighter Command, he delivered one of his most famous lines:
"Never in the field of human conflict was so much owed by so many to so few."
This powerful tribute captured the spirit of the day and cemented the pilots’ legacy in British memory forever.


21st August
Wednesday, August 21, 1940, was a day of relentless, if scattered, conflict.
Poor weather and low visibility hampered large-scale Luftwaffe operations, but the air war continued unabated, with reconnaissance probes and small-scale raids hitting targets across a wide front.
Fighter Command remained on high alert, correctly anticipating that the threat would come in smaller, more elusive forms.
...a robust defensive screen...
British radar stations detected a formation of Dornier Do 17s approaching Norfolk, but No. 242 Squadron quickly engaged, breaking up the attack and forcing the bombers to seek refuge in the clouds.
Meanwhile, a coastal convoy in the Dover Straits came under sustained attack from both artillery and bombers, but a robust defensive screen of barrage balloons and anti-aircraft fire forced the Germans to jettison their bombs prematurely.
The most damaging raid of the day struck a Coastal Command airfield at RAF St. Eval in Cornwall. Junkers Ju 88s from KG 30 launched a brutal attack, destroying six Blenheims on the ground and setting hangars ablaze.
RAF fighters scrambled, but they arrived too late to prevent the destruction.
...a constant, grinding struggle...
The day's combat was a true war of attrition. At Middle Wallop, a Ju 88 was shot down, and over Ipswich, a Hurricane pilot downed a Dornier before being severely damaged.
Even as night fell, the fighting continued, albeit with fragmented and largely ineffective raids.
The day was not one of large, decisive battles, but a testament to the new reality of the Battle of Britain - a constant, grinding struggle fought not just by pilots, but also by every civilian on the ground.

22nd August
On August 22, 1940, squally weather limited the Luftwaffe's large-scale operations, but a steady stream of smaller attacks continued.
The day's first major engagement saw a German artillery barrage and a subsequent bomber raid target Convoy Totem in the Strait of Dover.
Despite intense fire, the convoy escaped, but a Spitfire pilot was tragically killed.
...rendered the airfield temporarily unserviceable...
Later, a raid on Manston Airfield proved more successful for the Germans, who destroyed two hangars and rendered the airfield temporarily unserviceable.
During the attack, two British pilots were killed or wounded in intense dogfights.
Meanwhile, the newly formed No. 302 (Polish) Squadron flew its second combat mission, with its presence serving as a powerful symbol of Allied unity.
...scattered but relentless actions...
As night fell, the war entered a new phase. German bombers, largely grounded during the day, conducted widespread single-aircraft raids across the country.
A precision attack on the Bristol Aeroplane Company at Filton used the advanced X-Verfahren navigation system, signalling a new, more accurate era of night bombing.
The day's scattered but relentless actions - from a sinking merchant ship to a symbolic first bombing of London - showed that even on a "quiet" day, the Battle of Britain was a brutal and continuous fight.
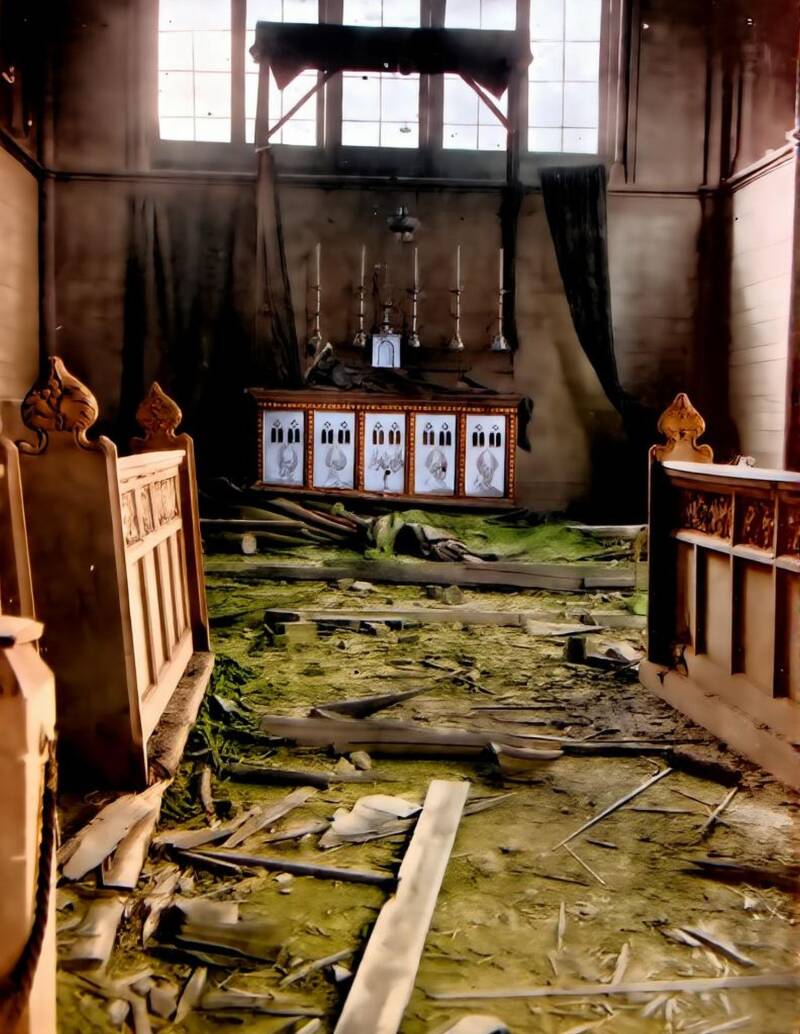
St Barnabas Church, Barton, after a Luftwaffe raid on the 22nd August 1940. Luftwaffe attacks in 1940 caused widespread damage to British churches, many of which stood near docks, railways, or dense housing targeted in raids. London lost numerous historic churches, including several by Wren, while Southwark Cathedral’s damaged nave became an early symbol of the Blitz. Cities such as Liverpool, Bristol, and Plymouth saw similar losses. Churches that survived often hosted relief work or open‑air services, turning damaged buildings into markers of endurance and community resilience.
Doyle Collection Battle of Britain 1940 | The Dover Historian

23rd August
Friday the 23rd August, 1940, was a day of persistent grey skies and scattered raids, a brief respite from the massed battles that had raged for weeks.
Poor weather and thick cloud cover severely restricted Luftwaffe operations, yet isolated raids still caused significant destruction.
One German aircraft penetrated deep inland to Rugby and Warwick, dropping bombs and strafing civilians, a chilling example of the war’s reach.
The day also marked a significant moment for the Allies: Canadian pilots of No. 1 RCAF Squadron flew their first combat mission, a powerful sign of international solidarity.
...demonstrating a new threat...
As the day wore on, a new and dangerous tactic emerged at sea. German Heinkel He 115 torpedo bombers sank two ships in the Moray Firth, demonstrating a new threat to Britain’s vital maritime supply lines.
When night fell, the war entered a new phase. German night raids, though not as widespread as the previous night, were more concentrated.
They struck industrial centers in Bristol and Birmingham, with bombs falling on docks, factories, and residential areas, causing widespread damage and casualties.
...a foreshadowing of the coming Blitz...
In a symbolic first for the capital, bombs fell on Harrow and Wealdstone, an area considered a part of London, a foreshadowing of the coming Blitz.
On the home front, Prime Minister Winston Churchill officially changed the name of the Local Defence Volunteers to the Home Guard, providing a new identity for the citizen soldiers now preparing to defend their homes from a potential invasion.
The day was not one of great air battles, but it was a day of profound, devastating, and far-reaching impacts on the British people.
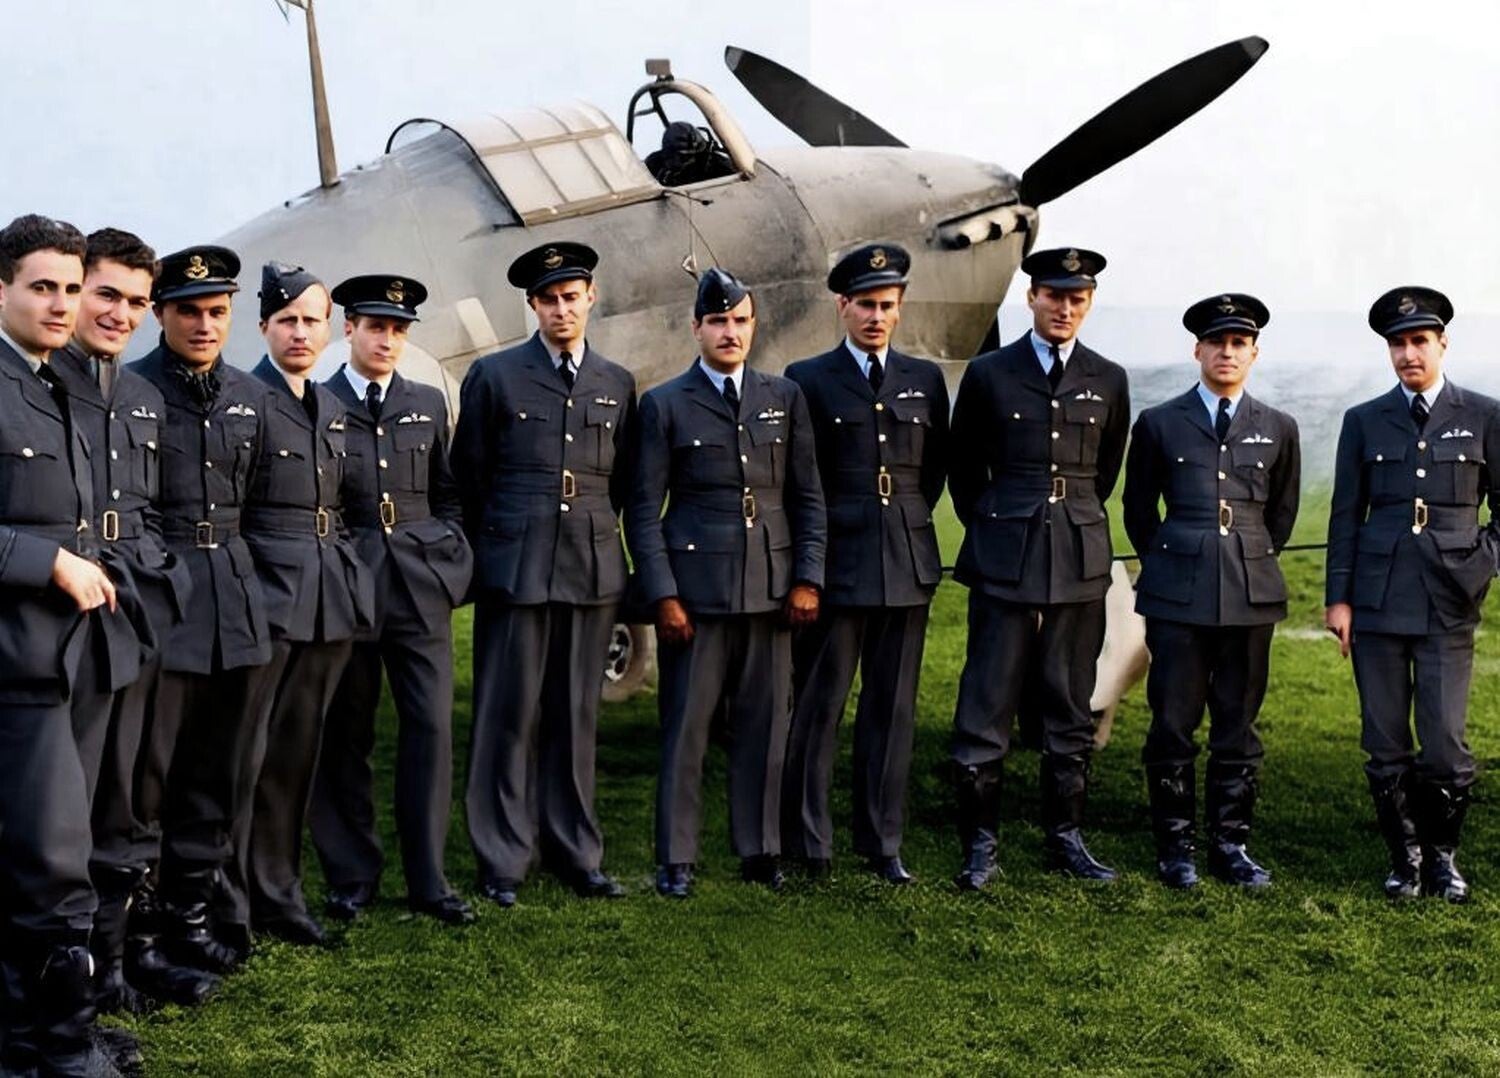
On 23 August 1940, No. 1 Squadron RCAF entered combat for the first time, becoming the only Canadian squadron to fight in the Battle of Britain. Just over two months later, on 30 October 1940, the surviving pilots gathered at Prestwick for a formal photograph beside one of their Hurricanes. The squadron had arrived in Britain in June and, after a short work‑up, proved itself quickly. Renumbered 401 Squadron in 1941, it later became the highest‑scoring fighter unit in the RAF’s 2nd TAF. The photograph notably includes five Montréal pilots standing together.
Imperial War Museum THE CANADIANS — In the Battle of Britain — Vintage Wings of Canada

24th August
Saturday the 24th August 1940, marked a brutal and decisive turning point in the Battle of Britain.
After a brief lull, both sides were left with a grim tally of losses, yet Reichsmarschall Hermann Göring had failed to achieve the decisive victory he had promised Adolf Hitler.
Under immense pressure, Göring issued a new directive: Fighter Command was to be worn down through a relentless campaign of attacks on airfields and the aircraft industry.
This new, rigid tactic, which forced German fighters to remain close to their bombers, was intended to force a final, decisive aerial battle.
The result was a day of stepped raids, feints, and massed assaults that stretched Fighter Command to its breaking point.
...the incredible feat of becoming an ace in a single day...

Pilot Officer Antoni Głowacki was a Polish fighter pilot who became a legendary "ace-in-a-day" during the Battle of Britain. Flying with No. 501 Squadron on the 24th August 1940, he shot down five German aircraft in a single sortie, a remarkable feat.
https://polishholokaust.blogspot.com/2022/08/tego-dnia-24-sierpnia-1940-roku-w.html
The day's fighting began at first light, with waves of German bombers and fighters approaching the Kent coast. RAF squadrons, including Spitfires of No. 610 Squadron and Hurricanes of No. 615 Squadron, were scrambled to meet the threat.
A brutal running battle developed over East Kent, where Boulton Paul Defiants of No. 264 Squadron proved particularly vulnerable to the agile Bf 109s.
The squadron suffered heavy losses, including their commanding officer, Squadron Leader Philip Hunter.
In a separate engagement, Polish Pilot Officer Antoni Głowacki of No. 501 Squadron achieved the incredible feat of becoming an ace in a single day, claiming five kills.
Despite the fierce fighting, the sustained attacks succeeded in heavily damaging Manston airfield, forcing its temporary closure and marking a tactical victory for the Luftwaffe.

...the war entered a terrifying new phase...
The afternoon brought more terror for the British people.
A major raid on Portsmouth devastated the city, resulting in over 100 civilian deaths and 300 wounded, the single heaviest loss of life on the ground to date.
As night fell, the war entered a terrifying new phase. A large formation of German bombers, off course for their intended target, accidentally dropped their bombs on East London.
This unintentional strike was the first widespread bombing raid on the capital.
Elsewhere, night raids struck industrial centers in Bristol, Birmingham, and other cities.
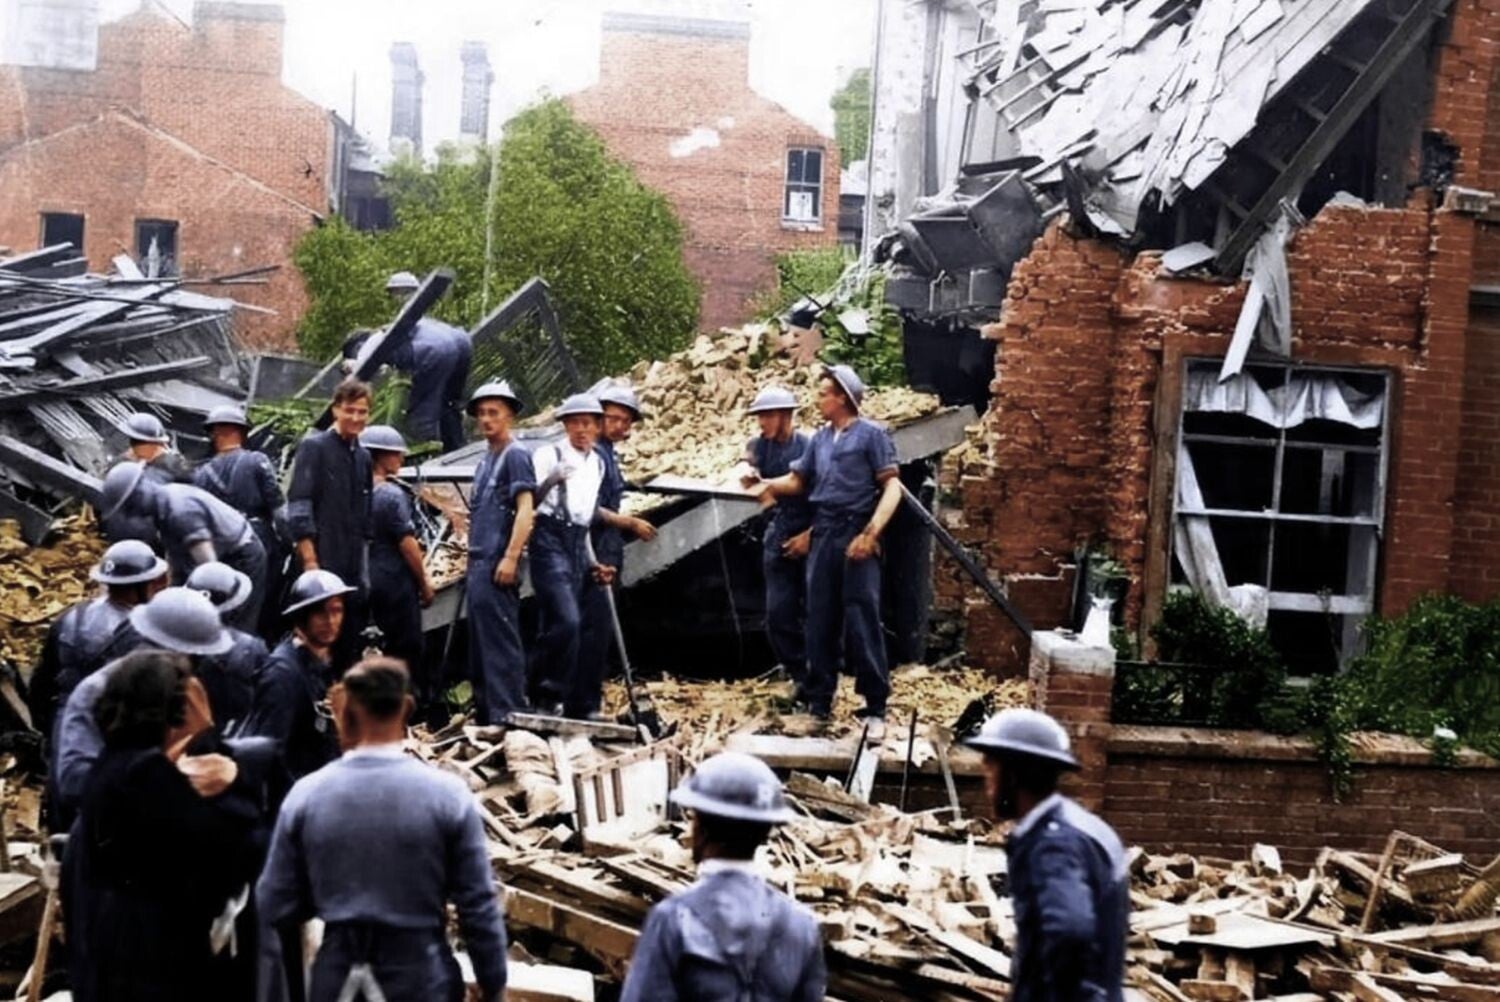
Chelsea Road, Southsea, on 24th August 1940 after a Luftwaffe raid. The Luftwaffe launched a major attack on Portsmouth, targeting the vital naval dockyard. This raid was part of a shift in German strategy, moving away from purely RAF airfields towards urban and industrial centers. The heavy bombing caused significant damage across the dockyard and surrounding residential areas, resulting in substantial civilian casualties and intensifying the Battle of Britain’s impact on coastal cities.
The News Portsmouth Photo: The News archive 16 spectacular photos capture life in Portsmouth in 1940s
...convinced Adolf Hitler to change his strategy...
The day was costly for both sides. The RAF lost 20 aircraft and 10 pilots, while the Luftwaffe lost at least 41 aircraft.
While key airfields and cities suffered significant damage, the German toll was so heavy that it convinced Adolf Hitler to change his strategy.
Winston Churchill’s swift order for a retaliatory raid on Berlin sealed the course of events, transforming the conflict from a tactical air campaign into the full-scale Blitz.
The 24th August 1940, had demonstrated both the resilience of Fighter Command and the Luftwaffe's shift towards sustained terror bombing, but ultimately, the RAF remained bloodied but unbroken.

An air gunner of No. 264 Squadron RAF about to enter the gun turret of his Boulton Paul Defiant Mk I at Kirton-in-Lindsey, Lincolnshire, August 1940. The Boulton Paul Defiants of No. 264 Squadron proved tragically vulnerable during the intense combat of August 1940. While designed as a day-fighter relying on its four-gun rear turret, German pilots quickly learned to attack the aircraft from head-on or below, where the guns could not bear. Consequently, the squadron suffered crippling losses over the Channel and Kent, leading to the Defiant's rapid and permanent withdrawal from the daylight fighting role.

25th August
Sunday the 25th August 1940, opened under a deceptive calm, but the late-summer stillness was a mere prelude to one of the most brutal and pivotal days of the battle.
After a five-day lull, the fighting resumed with a new fury, a direct consequence of a strategic shift by Reichsmarschall Hermann Göring.
His new directive called for massed, tightly coordinated bomber streams with heavy, close fighter escorts, designed to overwhelm Fighter Command in a single, decisive blow.
The day’s events would prove to be a merciless test of this new strategy, and a costly one for both sides.
...targeting the crucial RAF airfield at Warmwell...
At 16:00, the first and largest assault began. Over 200 German aircraft swept across the Channel toward the southwest, their formations targeting the crucial RAF airfield at Warmwell, along with key naval assets at Weymouth and Portland.
The raid was spearheaded by Junkers Ju 88s from II./KG 51 and II./KG 54, protected by a formidable screen of Bf 110s and Bf 109s from units like JG 2 and JG 53.
Fighter Command scrambled every available squadron from 10 and 11 Groups, including Spitfires from Nos. 152 and 609 Squadrons, and Hurricanes from Nos. 87 and 213 Squadrons.
...a grim toll...
The ensuing clash was ferocious and widespread, with losses mounting on both sides.
The RAF lost sixteen fighters, a grim toll that included Squadron Leader Cedric Williams, commander of No. 17 Squadron, whose Hurricane was shot down by a Bf 110.
The Luftwaffe also suffered significant losses, with Count Manfred Czernin of the RAF downing an incredible three Bf 110s in a single minute through a combination of head-on and rear attacks.
Despite the heroic defense, several Ju 88s broke through to bomb Warmwell, damaging hangars and buildings.
While the airfield remained serviceable, the raid proved the effectiveness of the new German tactics in pushing bombers through to their targets, albeit at a heavy price.


Pilot Officer Keith Gillman was killed on the 25th August 1940.
Count Manfred Czernin
Full name Graf Manfred Maria Edmund Ralph Beckett Czernin von und zu Chudenitz, was an Austrian‑born RAF fighter ace, made his name during the Battle of Britain. Flying Hurricanes with No. 17 Squadron, he developed a reputation for fast, decisive attacks.
On 25 August 1940 he intercepted a formation of Bf 110s and destroyed three in a single minute, a feat highlighted in his DFC citation.
By the end of 1940 he was firmly established as an emerging ace, later proving equally formidable in covert SOE operations across occupied Europe.
...exhausted British pilots...
Later that evening, a second major raid over Kent and the Thames Estuary was met with similar ferocity, as the exhausted British pilots were forced into action once more.
As darkness fell, the Luftwaffe launched widespread night attacks on industrial centers across the country.
Heinkel He 111s from KG 55 struck Bristol, while others bombed Birmingham and Coventry, causing widespread damage and casualties.
...the psychological shock was immense...
The most significant event of the day came when a formation of German bombers, off course for their intended target, accidentally dropped their bombs on East London.
This unintentional strike was the first widespread bombing raid on the capital. Winston Churchill’s immediate response was to order Bomber Command to retaliate against Berlin.
Although the physical damage to the German capital was slight, the psychological shock was immense.
This act of reprisal marked a pivotal shift in the Battle of Britain, transforming the conflict from a tactical air campaign against Fighter Command into a brutal, total war that would soon become known as the Blitz.
The battle for air supremacy over the Channel had been abandoned for a new, and terrifying, war on Britain's cities.

26th August
By late August, the Luftwaffe had become frustrated by Fighter Command's resilience, and Reichsmarschall Hermann Göring enforced a new, rigid tactical doctrine: large-scale, heavily escorted daylight raids.
This approach, which kept fighters tightly bound to bombers, was designed to guarantee that the bombers reached their targets, albeit at the cost of tactical flexibility.
On August 26, 1940, Luftflotte 2 put this new strategy to the test with three major daylight operations across southern England. The day's events were a brutal and costly ordeal for both air forces, pushing them to their breaking point.
...were also decimated...
The first major raid struck at mid-morning, with around 50 Dornier Do 17 bombers and up to 100 fighters attacking the Dover–Folkestone sector.
Fighter Command scrambled six squadrons to meet the threat, but the defence was costly. No. 616 Squadron was caught climbing into position and lost seven Spitfires in rapid succession, with two pilots killed.
The two-man Defiants of No. 264 Squadron were also decimated, losing three aircraft to the fighter escort, though their gunners claimed several bombers in return.
By 12:50, the raid had been broken up, with limited damage to ground targets.
British workers salvage Aluminum from wrecked German raiders shot down over England on the 26th August 1940. The Luftwaffe suffered significant losses during operations over southern England that day as part of Adlerangriff. Engaging heavily defended RAF airfields and convoys, German bombers and fighters faced determined resistance from Hawker Hurricanes and Supermarine Spitfires. Estimates indicate that the Luftwaffe lost around 20–25 aircraft, including both bombers and escort fighters, with additional planes damaged. These losses highlighted the growing effectiveness of RAF Fighter Command, particularly the use of radar and coordinated defensive tactics, and foreshadowed the attritional nature of the air campaign that would intensify in September 1940.
...the fierce combat...
The second assault was even larger, involving 78 Do 17s and over 120 fighters that crossed the Essex coast.
Ten RAF squadrons, including the Czechs of No. 310 Squadron and No. 1 (RCAF) Squadron, scrambled to intercept.
During the fierce combat, Flying Officer R. L. Edwards became the first Canadian fighter pilot killed in action, shot down by defensive fire from a Do 17.
Despite the heavy opposition, six bombers broke through to bomb RAF Debden, destroying a hangar and other buildings, killing six personnel, and damaging several aircraft on the ground.
...were forced to jettison their ordnance...
The final major daylight operation fell to Luftflotte 3, with around 50 Heinkel He 111s escorted by over 100 fighters attacking Portsmouth and Southampton.
Many of the bombers were forced to jettison their ordnance into the Channel before reaching their targets, but Portsmouth was still badly hit.
Bombs struck the dockyard, damaging naval vessels like the destroyer HMS Acheron and the HMS Bulldog, and setting fire to a gasworks.

Fort Cumberland in Portsmouth after the Luftwaffe raid on the city on the 26th August 1940 by 150 aircraft. Approaching the Isle of Wight, they were intercepted at 16,000 feet by eight squadrons of RAF Spitfires and Hurricanes. Cloudy weather and constant harassment by the RAF made target acquisition difficult, forcing many bombers to overshoot the city without releasing their bombs. Forbidden to return loaded, they jettisoned their payload, hitting Langstone Harbour and waste ground, though the Hilsea gas works was struck. A single bomber group hit Fort Cumberland, causing 14 casualties. The RAF's decisive intervention prevented mass casualties in the city. German records deemed the raid a total failure, with eight aircraft lost.

27th August
Wednesday, August 27, 1940, offered a brief respite from the massed battles, with poor weather and low cloud severely restricting Luftwaffe operations.
Nonetheless, a number of German reconnaissance flights were intercepted and shot down across the south coast, with Major Wolfgang Schellmann of JG 2 claiming a Spitfire off the Dorset coast.
While the skies were quiet, an important internal debate raged within Fighter Command as AVM Keith Park met with AVM Sholto Douglas to voice his objections to the "Big Wing" formation, highlighting critical tactical disagreements.
...a sharp increase in night operations...
As darkness fell, this new, terrifying phase of the battle continued.
The Luftwaffe launched a sharp increase in night operations, with the heaviest traffic heading toward Birmingham and Coventry.
Widespread bombing occurred across Bristol, Plymouth, and other industrial cities, causing serious damage to factories, dockyards, and residential areas.
The BSA Small Arms Works at Smallheath in Birmingham sustained serious damage.
On the home front, reports of parachute landings triggered false Home Guard alerts, a sign of the widespread fear and paranoia.
...a grim reflection of the war's reach...
The day was costly for both sides, but particularly for the civilians on the ground.
The RAF lost just 4 airmen and 7 aircraft, while the Luftwaffe lost 12 airmen and 11 aircraft, with many of the German losses occurring during the day's brief skirmishes.
However, total ground casualties from enemy action were recorded as 37 killed and 102 injured, a grim reflection of the war's reach even on a day of relative calm.
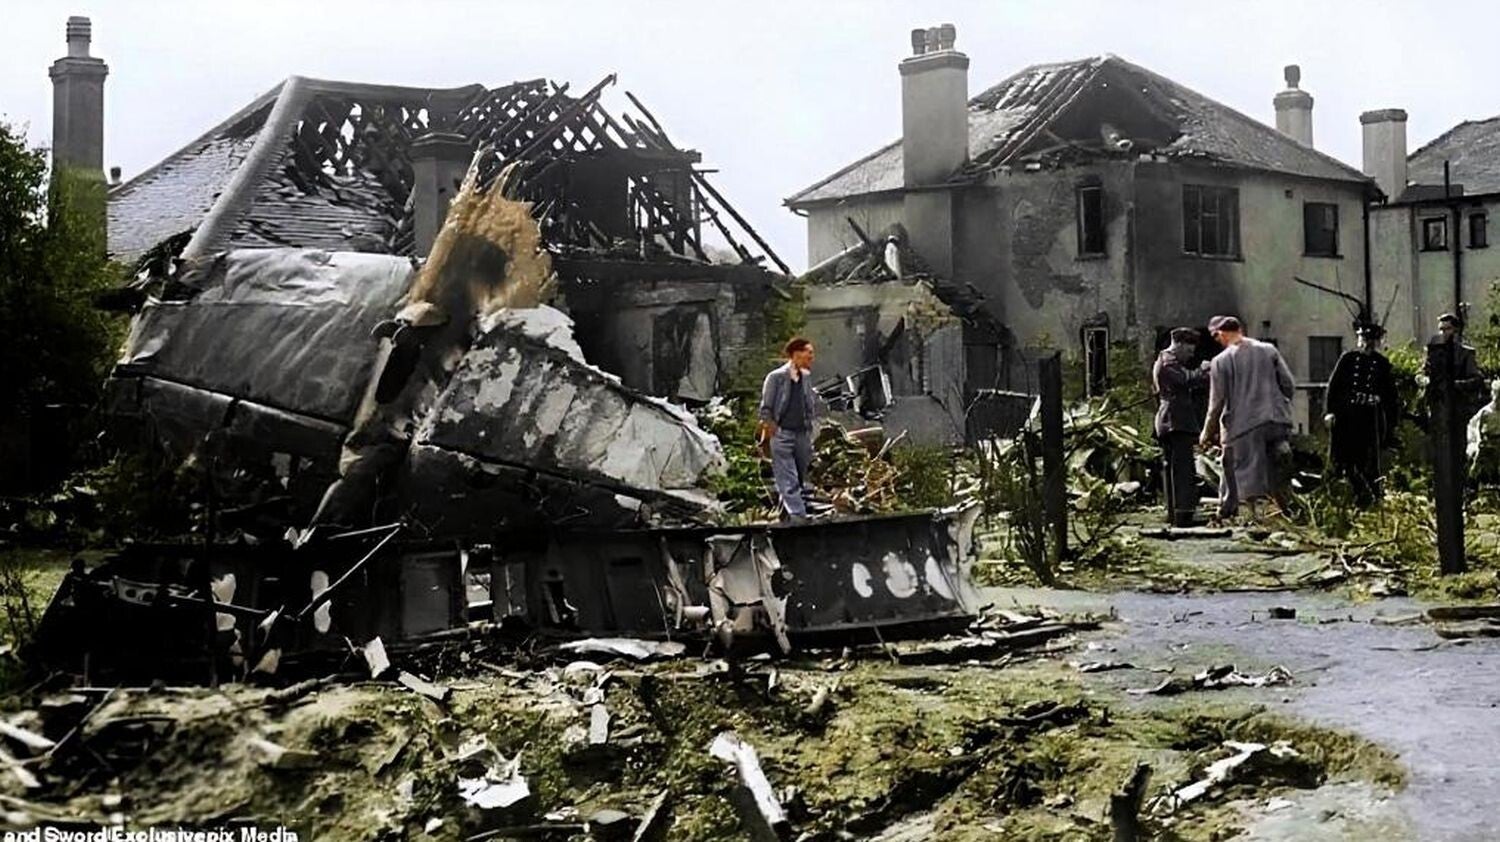
The remains of Heinkel He 111H-2 (Werke/Nr. 5367 V4+CD) of Stab III./KG 1, which crashed into houses at Manor Avenue in Caterham, Surrey on the night of 26/27 August 1940 after suffering a direct hit from anti-aircraft fire during a night mission to bomb factories in the Coventry area. The Heinkel He 111 was a cornerstone of the Luftwaffe's bomber force during Adlerangriff. Despite its modern design, the aircraft's slow speed and inadequate defensive armament made it a vulnerable target for RAF fighters. It suffered heavy losses, particularly in daylight raids, which forced German commanders to provide increasingly large fighter escorts and ultimately led to a strategic shift to night bombing.
Tuesday 27 August 1940 | The Battle of Britain Historical Timeline

28th August
The cold, clear dawn across southern England set the stage for a day of grinding attrition, as the Luftwaffe executed Göring's directive to destroy RAF airfields.
Following early reconnaissance flights, the first major blow fell at 08:30 hours.
Two massive formations of sixty bombers each, escorted by Messerschmitt Bf 109s, roared across the coast toward Eastchurch and Rochford.
...a tragic lesson learned...
The RAF scrambled to intercept, but the battle proved devastating for No. 264 Squadron, whose Defiant fighters were outmatched.
Three of their twelve aircraft were shot down, and five aircrew were killed.
The squadron was immediately withdrawn from daylight operations, a tragic lesson learned in the face of superior German fighters.
The Luftwaffe pressed on, leaving Eastchurch badly scarred and Rochford’s landing ground cratered.
The fierce morning saw the RAF lose eight fighters and six pilots, while five German aircraft were destroyed.
Among the German losses was Leutnant Arthur Dau, a seven-victory ace shot down and captured by Sergeant George Smythe.

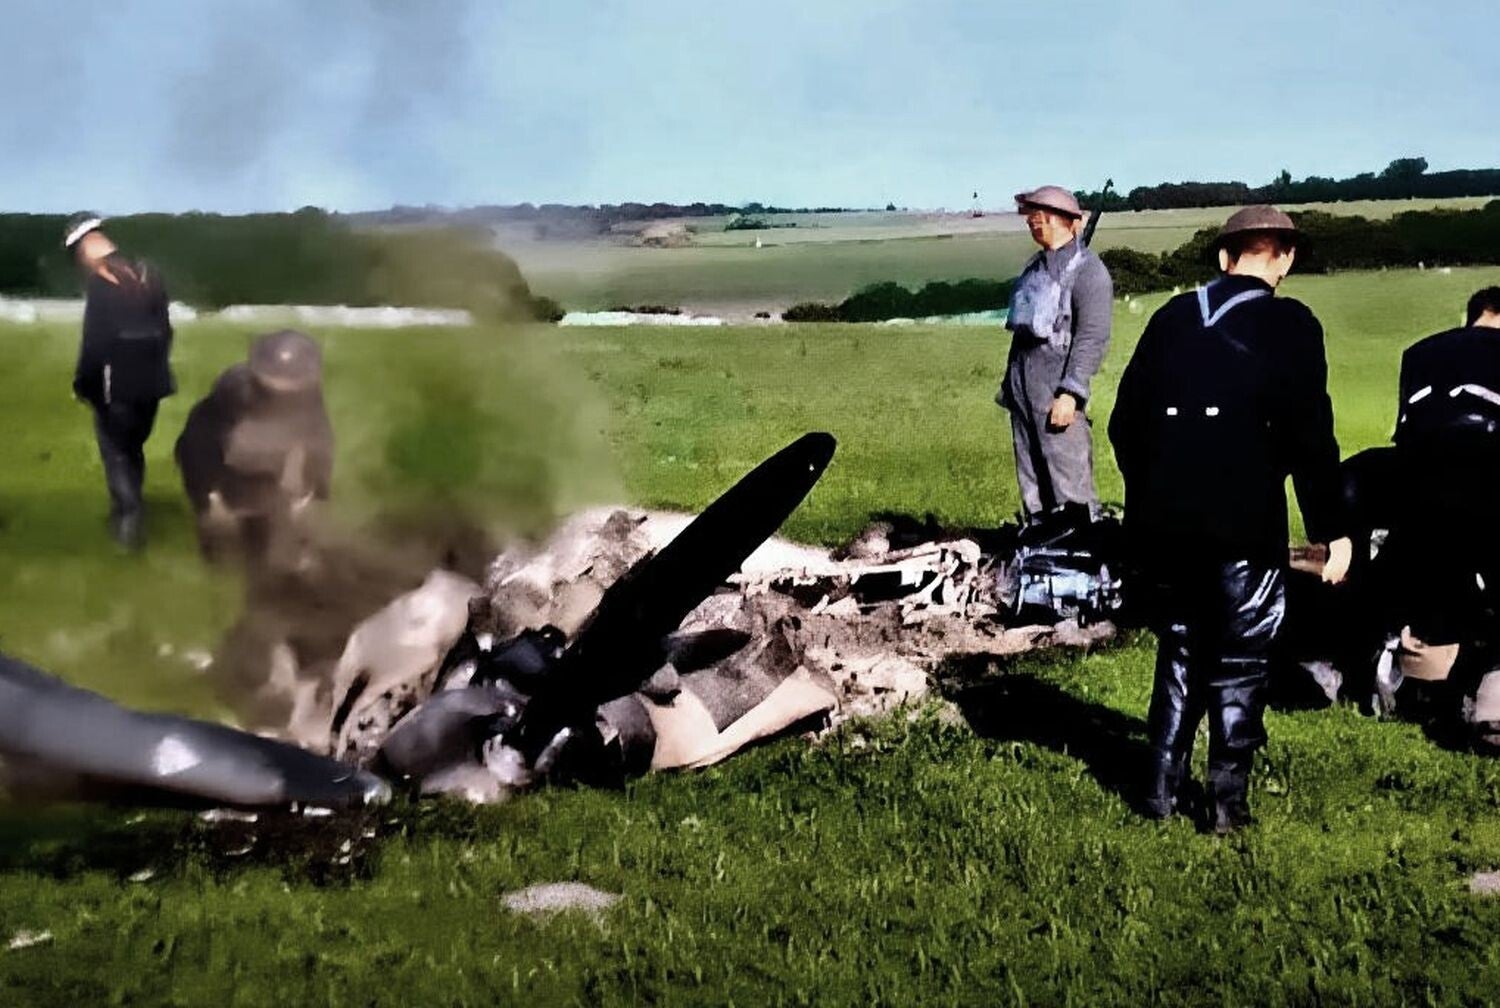

While at Dover Castle on August 28, 1940, Winston Churchill witnessed a dramatic dogfight, watching an RAF Spitfire down a Luftwaffe Me 109 that plunged into Church Whitfield. Ignoring the real danger of remaining enemy aircraft, Churchill immediately insisted on visiting the crash site, much to the dismay of his bodyguard, W.H. Thompson. (The pilot later succumbed to his injuries.) Shortly afterwards, Thompson was able to usher the Prime Minister back to safety.
Picture Copyright Luftwaffe Crash Archive /Red Kite Books
...fierce combat erupted...
The afternoon offered no respite. At midday, Dorniers returned to Rochford, igniting another furious combat.
In the ensuing dogfight, Flight Lieutenant Al Deere claimed a Bf 109 before bailing out, while another pilot’s chase ended so low his fire killed a cow.
Later, a major fighter sweep saw seven Gruppen of Bf 109s fill the skies over Kent, seeking to draw RAF fighters into a decisive battle.
Despite orders not to engage, fierce combat erupted, resulting in sixteen fighters destroyed.
Several German aces were shot down and captured, including Hans-Herbert Landry and Georg Beyer.
...shattering Göring’s boast...
During the afternoon's chaos, Prime Minister Winston Churchill witnessed a dogfight from Dover Castle, observing two enemy aircraft plummet into the sea.
Later, upon inspecting the wreckage of a downed fighter, he remarked, “Dear God, I hope it isn’t a British plane,” before being reassured of the aircraft's German origin.
The day’s fighting bled into the night, which saw the heaviest German night operations so far. Liverpool was the main target for 150 bombers, while other raids struck Coventry and Birmingham.
In a bold act of retaliation, RAF Bomber Command carried out its second raid on Berlin, causing the first recorded civilian casualties in the German capital and shattering Göring’s boast.
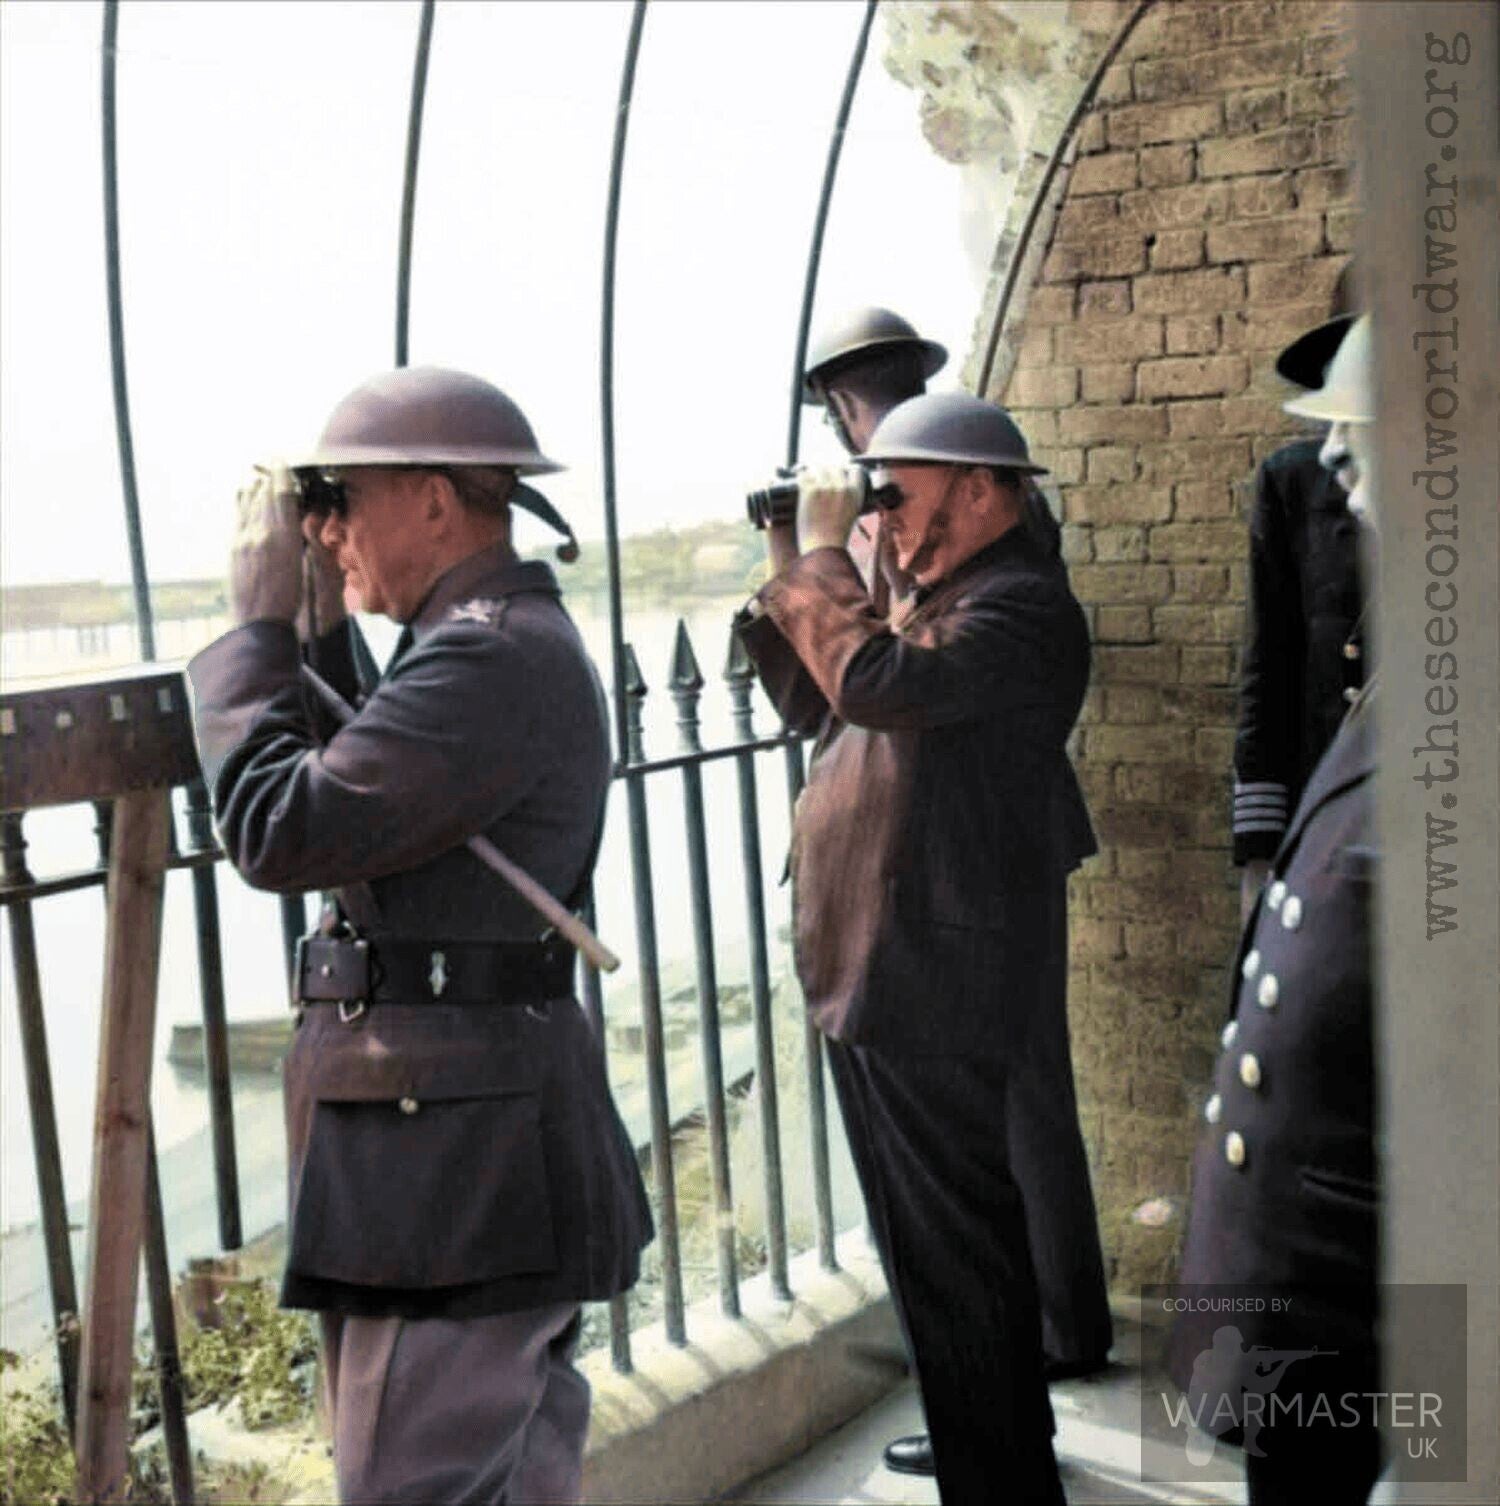
British Prime Minister Winston Churchill visits 'Hell-Fire Corner' – Dover, Kent, UK - on the 28th of August 1940. During the entirety of August 1940, the Kent coastline, grimly nicknamed Hellfire Corner, became the focal point of the Battle of Britain's most intense period, Adlerangriff. The Luftwaffe launched ceaseless, massed raids targeting the forward bases of No. 11 Group, including the critical airfields of Manston and Hawkinge, alongside coastal radar stations. Dover Castle stood firm amidst the onslaught, housing a vital underground command post overlooking the narrow Straits of Dover. The relentless, daily attacks on this perilous zone meant it absorbed the highest frequency of hostile crossings and ground strikes throughout the entire campaign.

29th August
The morning of August 29th offered a deceptive calm, with intermittent showers and bright spells over Britain.
After days of relentless attack, a brief lull settled as only a few German reconnaissance aircraft probed the coast.
But this quiet was a strategic lie. In the late morning, the Luftwaffe launched the largest fighter sweep of the war so far.
A vast armada of over 560 Bf 109s and 150 Bf 110s swarmed across the Channel, seeking to force a decisive battle.
Yet, the RAF controllers, recognizing the bait, held their fighters back. The German command, mistaking this tactical restraint for defeat, declared they had achieved "unlimited fighter superiority."
...sparking heavy combat...
The real fighting began in the afternoon.
A large force of nearly 170 aircraft headed toward Biggin Hill, sparking heavy combat over Kent. While RAF pilots claimed several victories, they suffered notable losses.
Pilots like Sergeant J.H. Mortimer Ellis and Sergeant F.R. Walker-Smith were shot down but managed to bail out and survive.
However, others were not so lucky.
In a later raid on Rochester, Flight Lieutenant Harry Raymond Hamilton, a Canadian pilot, was killed when his Hurricane was shot down.
...the relentless pressure had taken a toll...
As dusk fell, the war shifted to the night.
The Luftwaffe launched its heaviest night offensive to date, with Liverpool enduring its second major raid, while other cities like Coventry and Manchester were also hit.
Amid the chaos, a new chapter of the Battle of Britain was being written with the official formation of the first Polish squadrons, a vital infusion of determined pilots who had lost their own nation.
By day’s end, the relentless pressure had taken a toll.
The RAF lost 10 aircraft and 2 airmen, while the Luftwaffe suffered a disproportionate defeat, losing 24 aircraft and 45 airmen.
The day ended as it began: a brutal, grinding struggle for air superiority.

30th August
Friday the 30th August 1940, was a day of relentless air combat and a turning point in the Battle of Britain.
The day began with a deceptive calm as German reconnaissance aircraft probed British defenses, attempting to draw RAF fighters into combat.
Air Vice-Marshal Keith Park held his squadrons back, wisely refusing to be baited, but the quiet was a mere prelude to a series of coordinated, massed assaults.
...scrambling every available squadron...
At midday, a massive raid of over 300 German aircraft swept across the Kent coastline in three consecutive waves.
These formations broke up over southern England, striking vital RAF airfields and civilian targets.
Fighter Command responded by scrambling every available squadron, committing sixteen units to the desperate defense of Kent and Surrey.
In the swirling chaos of the dogfights, pilots on both sides were killed, but in a significant moment for the Allies, the newly formed No. 303 (Polish) Squadron saw its first combat and scored its inaugural kill.
...rendered barely operational...
The most devastating raid of the day struck in the late afternoon.
Approximately 300 enemy aircraft entered East Kent, spreading out to hit multiple targets. RAF Biggin Hill was particularly hard-hit, with a low-level bombing run destroying hangars and severing vital communications and utilities.
The airfield was rendered barely operational, and thirty-nine personnel were tragically killed in a direct hit on a shelter trench.
Other airfields, including Detling and Lympne, also sustained severe damage.
The raids were not limited to military targets; the Vauxhall Motor Works in Luton was hit without warning, killing fifty-three civilians and injuring 140 more.

Sergeant Joan Mortimer, Flight Officer Elspeth Henderson, Sergeant Helen Turner. Members of the WAAF (Women’s Auxiliary Air Force) at Biggin Hill, they were awarded the Military Medal for gallantry after the Luftwaffe attack on the airfield on 30th August. Despite an air raid taking place, they had refused to leave their posts and continued commutations with Fighter Command, relaying vital information. The building took a direct hit and they were thrown to the floor, but it was only when the room began to catch fire that they were ordered to finally leave their posts.
...significant operational consequences...
As night fell, the Luftwaffe shifted to a widespread night offensive.
The industrial Midlands were a primary target, with raids hitting Bristol, Birmingham, and Liverpool.
The bombing also extended to London, where key radar stations were disabled, an attack that had significant operational consequences for Fighter Command.
The day’s toll was grim for both sides. The Luftwaffe flew over 1,300 sorties and lost 40 aircraft confirmed destroyed.
The RAF lost 25 aircraft and nine pilots, while civilian casualties mounted across the country.
Despite suffering heavy losses and severe damage to its critical infrastructure, Fighter Command remained operational and unbroken.
The German commanders had failed to achieve air superiority, and their costly raids had only steeled Britain’s resolve.

The War Weekly' newspaper, dated 30 August 1940, described this period of the fighting as "savage and intense", with images of downed Luftwaffe aircraft featured in their publication. The week leading up to and including August 30, 1940, saw the Luftwaffe escalate its offensive with massive daylight raids and new night bombing tactics. Despite flying a staggering number of sorties and inflicting significant damage on RAF airfields, these efforts proved costly and failed to achieve a decisive breakthrough. The Luftwaffe suffered a high rate of attrition, demonstrating its inability to defeat Fighter Command and secure air superiority.
31st August
Saturday, the 31st August 1940, became the single worst day for the RAF during the Battle of Britain.
The Luftwaffe flew over 1,000 sorties, concentrating its efforts on airfields in the south and southeast of England.
By day's end, the RAF had suffered its highest losses yet: 41 fighters destroyed, with nine pilots killed and numerous others wounded.
The first major assault began at 07:55 hours, as five German formations totaling more than 250 aircraft converged on the Thames Estuary.
AVM Keith Park ordered his squadrons to avoid unnecessary fighter-versus-fighter combat, but No. 1 (RCAF) Squadron missed the signal and engaged the enemy, losing three Hurricanes and seeing pilots severely burned.
Meanwhile, Bf 109s swept down over Dover, destroying all 23 barrage balloons and leaving the port exposed.
...surviving with severe burns to his face, hands, and legs...
The German attacks grew more focused and devastating.
Debden was heavily hit by over 100 bombs, damaging barracks and cratering the landing ground. Biggin Hill was a primary target, suffering extensive damage to its hangars and operations block, which severed all communications and made the airfield unserviceable.
Simultaneously, 60 Dorniers struck Hornchurch, destroying three Spitfires on the runway during the attack.
The human cost was immense. S/L Tom Gleave of No. 253 Squadron was forced to bale out of his burning Hurricane after a fierce dogfight, surviving with severe burns to his face, hands, and legs.
As darkness fell, the bombing continued, with raids on Liverpool and the industrial Midlands.
...many squadrons were critically under strength...
Despite the catastrophic losses and the severe damage to its airfields, the RAF remained in the fight.
No. 11 Group’s airfields were shattered, and many squadrons were critically under strength, with squadron leadership falling to junior officers.
The Luftwaffe too felt the strain of the campaign of attrition, but their grim determination to break the RAF had not yet succeeded.
The month of September would determine the battle’s outcome, but for the RAF, August 31 was a day of profound sacrifice.

1st September
On September 1, 1940, the "Bad Weekend" of relentless aerial combat entered its third brutal day.
The Luftwaffe once again concentrated its formidable power on RAF Fighter Command's vital sector stations and forward airfields.
The attacks, while slightly reduced in number, were no less damaging, with four major raids developing throughout the day.
Despite the determined resistance of RAF squadrons, the continuous, grinding strain on No. 11 Group was becoming critical, with squadrons stretched to their limits.
...dividing to strike multiple objectives...

RAF pilot John Hugh Mortimer Ellis was killed in action on the 1st September 1940. His Hurricane was seen to crash into a field in Kent after clashing with Luftwaffe fighters.
The day's first major attack began with the assembly of a striking force of about 120 aircraft, which crossed the coast near Dover before dividing to strike multiple objectives.
The formation, comprising Heinkel He 111s of KG 1 and Dornier Do 17s of KG 2 and KG 76, along with a powerful fighter escort, targeted Biggin Hill, Eastchurch, and the docks at Tilbury.
Fourteen RAF squadrons were scrambled to intercept the raiders.
In a fierce dogfight near Beachy Head, a Spitfire and a Hurricane were shot down by ambushing Bf 109s, their pilots tragically killed.
The attack on Tilbury caused extensive damage and killed five civilians, while a separate raid on Gravesend demolished homes and injured many more.
...abruptly interrupted by low-level bombing runs...
The afternoon offered no respite. At 13:40 hours, another wave of 150 German aircraft, comprising Do 17s and Bf 110s with heavy escort, pressed inland, once again targeting Biggin Hill and Kenley.
At Biggin Hill, a funeral service for personnel killed in earlier raids was abruptly interrupted by low-level bombing runs.
The airfield was rendered unserviceable, a stark testament to the unyielding German attacks.
The cost to the RAF was high, with three Hurricanes from No. 85 Squadron shot down.
One pilot, Sergeant G. B. Booth, tragically survived a fiery fall but later died from his injuries.
...displayed exceptional bravery...
Amidst the devastation, acts of remarkable courage shone through.
During the heavy bombing of Biggin Hill, three women of the Women's Auxiliary Air Force (WAAF) displayed exceptional bravery.
Sergeant Joan E. Mortimer delivered orders by bicycle across the airfield while bombs fell nearby, while Flight Officer Elspeth C. Henderson and Sergeant Helen E. Turner maintained vital communications from within the operations room under direct bombardment.
Their actions were instrumental in keeping the station operational and earned them the Military Medal.
...their own numbers were dwindling critically...
As the day concluded, night brought a widespread Luftwaffe offensive against targets in the Bristol Channel, South Wales, and the Midlands.
While RAF squadrons inflicted losses on the German formations, their own numbers were dwindling critically.
By the close of the day, key airfields like Biggin Hill, Kenley, and Detling had been rendered inoperable.
The Luftwaffe had not yet destroyed Fighter Command, but the severe pressure and mounting losses set the stage for the next and most critical phase of the battle.

Raging fires silhouette St Pauls Cathedral after a lone German bomber dropped incendiary bombs 1st September 1940. On 1 September 1940, during the height of the Battle of Britain, St Paul’s Cathedral in London stood as a powerful symbol of resilience amid the Luftwaffe’s bombing campaign. While the surrounding city suffered widespread damage during nightly raids, the cathedral survived largely intact, its dome rising above smoke and ruins. Images of St Paul’s standing amidst fires and clouds of smoke became emblematic of British determination and morale. Anti-aircraft guns and firefighter crews worked tirelessly to protect the area, ensuring that the historic structure endured as a national icon and a visual testament to Londoners’ courage during the Blitz.

2nd September
Monday the 2nd September 1940, brought fine weather and four major waves of heavy Luftwaffe attacks against RAF airfields and industrial targets.
The day began with a morning raid of over 100 aircraft, targeting Biggin Hill, Eastchurch, and Rochester’s Short Brothers aircraft factory.
Despite timely RAF interceptions, bombs struck the factory, and eleven high-explosive bombs hit Gravesend Aerodrome, disrupting infrastructure.
...the only siblings killed in action during the Battle of Britain...
The midday onslaught was even larger, with over 225 German aircraft crossing the coast.
The fighting was intense over Kent and the Thames Estuary, with RAF squadrons outnumbered by over eighty Bf 109s.
The day brought a profound tragedy: Pilot Officer C. A. Woods-Scawen of No. 43 Squadron was shot down and killed.
His death followed that of his older brother just the day before, making them the only siblings killed in action during the Battle of Britain.
A separate formation in this wave bombed Brooklands, damaging facilities for Wellington bomber production.
...sustained severe damage...
The attacks continued into the late afternoon with a new raid of 250 aircraft.
The airfield at Eastchurch sustained severe damage after a bomb dump exploded, rendering it unusable and forcing its evacuation.
At Debden, an emergency operations room was established off-site due to damage.
By dusk, the Luftwaffe had lost 37 aircraft to the RAF’s 14, but the British airfields had been severely hit. Debden, Detling, and Eastchurch were all declared unserviceable.
Widespread night raids followed, with bombers striking Bristol, Liverpool, and Swansea, where the railway station and grain warehouses were destroyed.
In a poignant coincidence, a Spitfire that was captured after its pilot landed in France was delivered to Major Adolf Galland.
This came shortly after Reichsmarschall Göring berated his fighter leaders, to which Galland had famously quipped that he wished for a squadron of Spitfires.
By the end of the brutal day, 51 civilians had been killed and 247 injured, a stark reminder of the war’s expanding reach.

A ninety-minute exposure taken from a Fleet Street rooftop during an air raid in London, on 2nd September 1940. The searchlight beams on the right had picked up an enemy raider. The horizontal marks across the image are from stars and the small wiggles in them were caused by the concussions of anti-aircraft fire vibrating the camera. The German pilot released a flare, which left a streak across the top left, behind the steeple of St. Bride's Church.
AP Photo

3rd September
Tuesday, September 3, 1940, saw the Luftwaffe launch a punishing series of four major aerial assaults, escalating the pressure on Fighter Command.
The main morning raid featured an imposing formation of over 150 aircraft—including Dornier Do 17s, Bf 110s, and Bf 109s—aimed at crippling RAF North Weald.
The attack on North Weald was devastating: over 150 bombs, many with delayed-action fuses, were dropped, severely damaging two hangars and destroying or damaging two Hurricanes and a Blenheim.
A squadron caught refueling on the ground was unable to scramble, intensifying the loss.

Soldiers carrying off the tail of a Messerschmitt 110, which was shot down by fighter planes in Essex, England, on September 3, 1940.
AP Photo
...a relentless counter-attack...
As the German formations withdrew, they were met by a relentless counter-attack over Essex and the Thames Estuary.
Spitfires and Hurricanes from eleven RAF squadrons, including the aggressive pilots of No. 310 (Czech) Squadron, pressed the pursuit, claiming numerous German aircraft; two Bf 110s even collided mid-air while attempting to evade the assaults.
Splits from the main raid attacked Hornchurch and Debden, while others hit industrial targets like the Short Brothers factory.
Over Margate, P/O Richard Hillary was shot down by Bf 109s, badly burned, but was rescued from the sea, an experience he would later immortalize in his memoir, The Last Enemy.

F/O Brian van Mentz, second from right, reports to the Intelligence Officer after a sortie with No. 222 Squadron at RAF Hornchurch. On 3rd September 1940, Van Mentz destroyed a Bf 110 and damaged another in Spitfire R6837.
...relying on wildly inaccurate intelligence...
By day's end, the Luftwaffe lost 20 aircraft to the RAF’s 15 (a total that included two Blenheims lost to friendly fire).
Night raids followed, striking Liverpool, South Wales, and Avonmouth. Crucially, while Fighter Command sustained damage, the most pivotal development occurred in The Hague.
There, Reichsmarschall Göring, relying on wildly inaccurate intelligence that claimed the RAF was all but defeated, decreed a Zielwechsel—a change of objective.
The primary focus of the Luftwaffe would shift from RAF airfields to the direct bombing of London.
This monumental misjudgment, tragically costing 37 civilian lives that day, unknowingly granted Fighter Command the essential time it needed to repair its shattered bases and recover its exhausted pilots, marking the strategic turning point of the campaign.
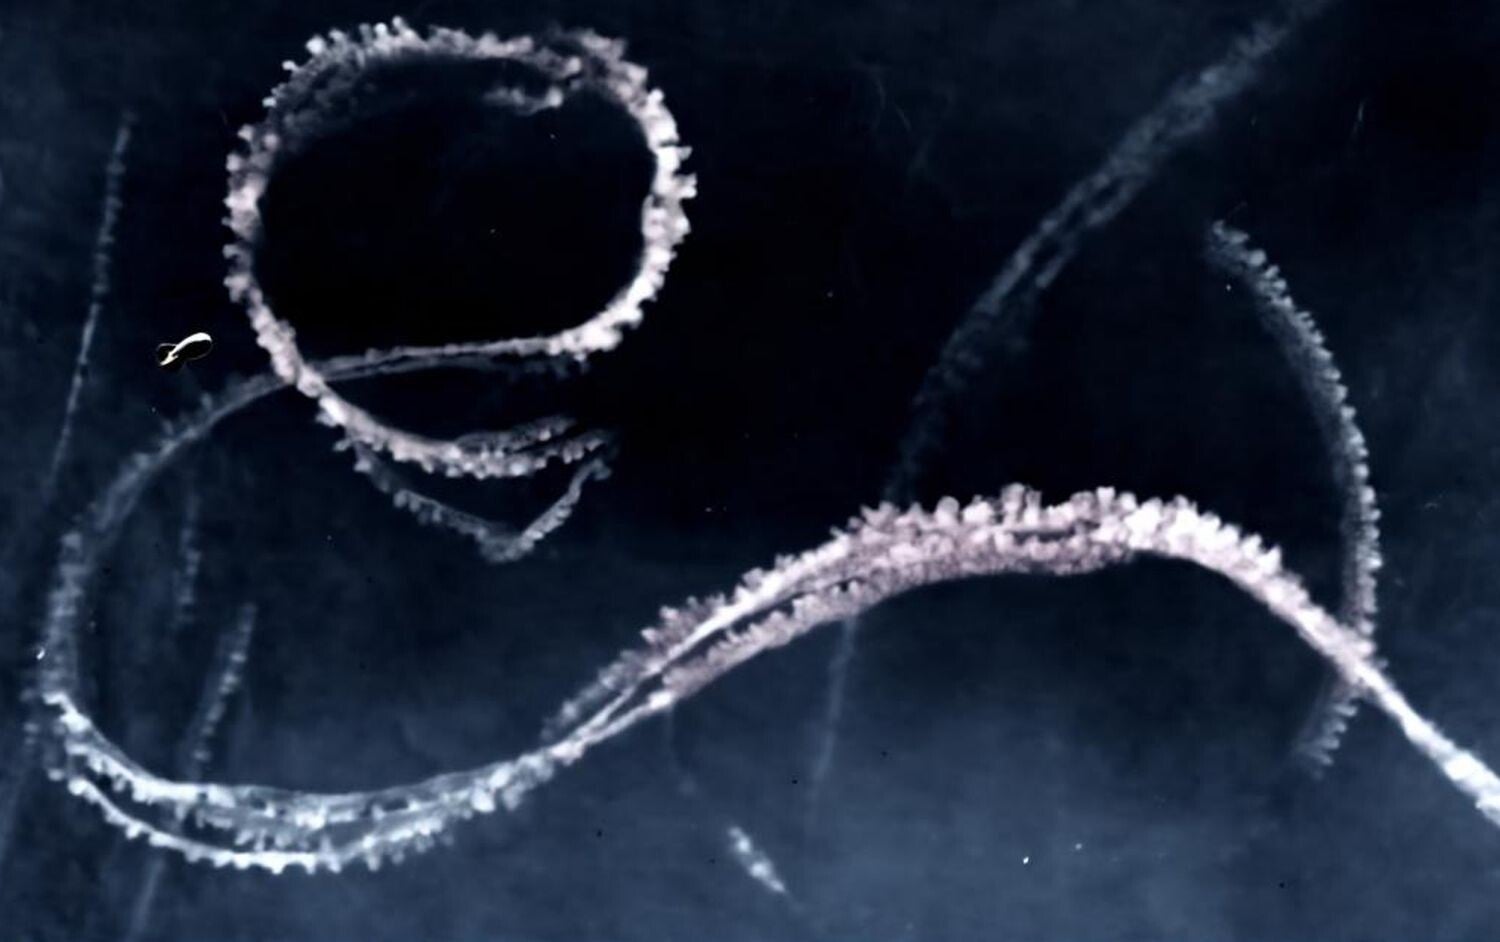
Vapor trails of areial dogfights taking place high over Kent on the 3rd September 1940. In September 1940, Kent stood on the frontline of the Battle of Britain. As the Luftwaffe shifted its focus from Channel convoys to airfields and towns, RAF Fighter Command fought relentlessly from bases across southeast England. Spitfires and Hurricanes clashed daily with German bombers and escorts above Kent’s skies. The county endured sustained bombing, yet the RAF’s resistance blunted German air superiority and helped prevent invasion.
Asisbiz 10 A new sight vapor trails of areial dogfights taking place high over Kent Sep 3 1940-01
4th September
The 4th September 1940, marked a strategic shift in the Luftwaffe's campaign, as attacks expanded from airfields to include vital British aircraft manufacturing.
The day began with two large raids totalling some 150 aircraft, striking airfields in East Kent and the Thames Estuary, including Eastchurch and Biggin Hill.
The major assault developed at midday, when nearly 300 German aircraft crossed the coast in a massive formation, drawing the full attention of Fighter Command.
While RAF squadrons rose to meet this threat, radar failed to detect a small, low-flying force of 14 Bf 110s that penetrated deep into Surrey.
These fighter-bombers mistakenly struck the Vickers-Armstrong Works at Weybridge—a crucial Wellington bomber factory.
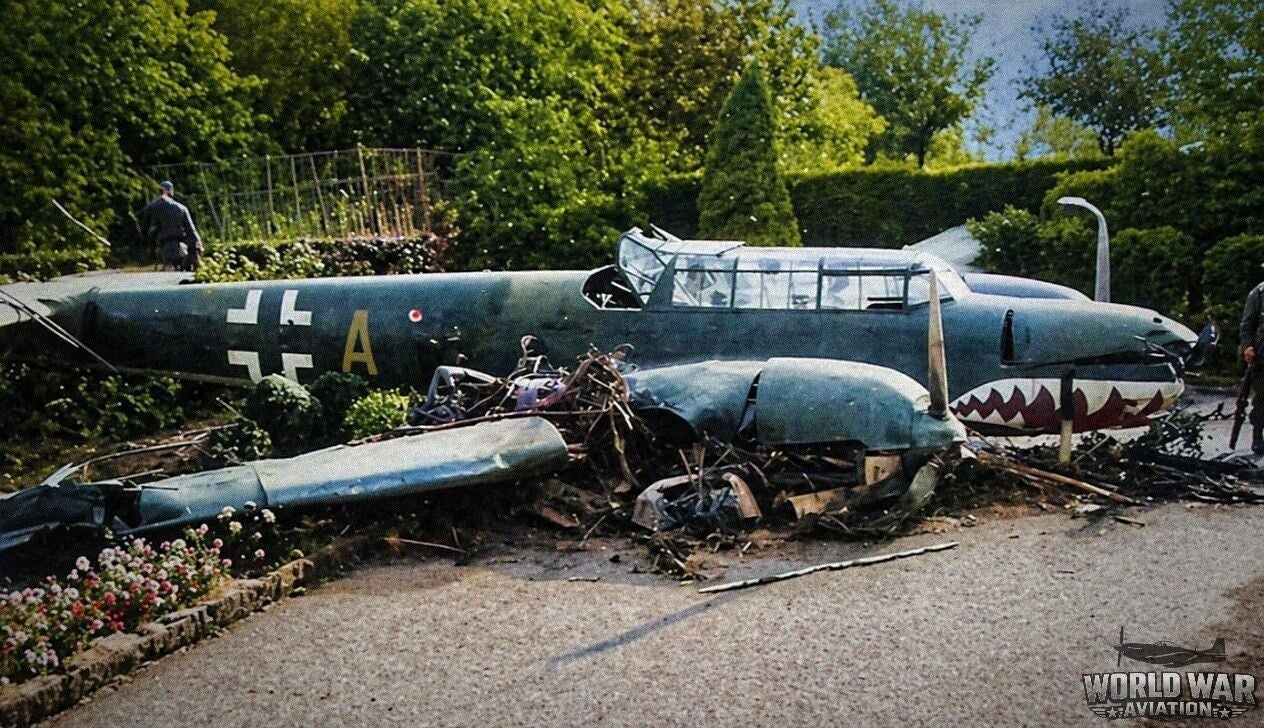
Bf 110C-4 of 9./ZG 26, forced down in an English public garden after an emergency landing on September 4, 1940. Damaged by RAF fighters during a sortie over southern England, the twin-engine heavy fighter came to rest among neatly trimmed hedges -a surreal contrast to the chaos of the skies above. The crew was captured shortly after landing.
...led to severe German losses...
The destruction was instant and devastating, occurring during the lunch hour.
The raid killed 88 workers and injured over 600, forcing a four-day suspension of bomber production.
This strategic strike, however, led to severe German losses. RAF fighters, now fully engaged, inflicted a heavy toll on the retreating enemy.
Spitfires of No. 234 Squadron alone claimed a staggering 14 Bf 110s destroyed over Worthing, contributing to the 28 enemy aircraft downed by the RAF that day, against a loss of 17 British aircraft.
A separate raid also successfully struck and damaged the vital Poling radar station.
...mocking British defences...
As the daylight fighting subsided, the night brought widespread raids against cities like Bristol, Liverpool, and Swansea, while German E-boats sank four vital coal steamers off Cromer.
Far from the conflict, Adolf Hitler addressed a crowd at the Berlin Sportpalast, mocking British defences and confirming that retribution was coming, solidifying the strategic decision to shift the focus of the bombing to London.

5th September
Thursday, September 5, 1940, dawned with perfect flying weather, allowing the Luftwaffe to launch a series of heavy, coordinated attacks.
The morning began with two major waves totaling over 120 aircraft, primarily targeting the already battered Biggin Hill aerodrome, along with other key airfields like Eastchurch and Lympne.
The RAF responded, engaging in fierce air combat across Kent. During one of the most notable dogfights, the famous German ace Oblt. Franz von Werra was shot down over Marden, crash-landing and being taken prisoner—a moment of triumph for Fighter Command that would later become a legendary tale of escape.
...setting off immense fires...
The afternoon brought a second major assault, with over 160 German aircraft striking the Thames Estuary.
The focus of this raid was the strategic oil storage depot at Thameshaven, which was successfully bombed, setting off immense fires that sent giant clouds of black smoke visible for miles.
While the Hawker factory at Brooklands sustained only light damage, the day highlighted the Luftwaffe's expanding focus on industrial targets.
...proved its aggressive prowess...
The fighting was costly for both sides. The RAF inflicted significant losses, destroying 18 Bf 109s and other enemy aircraft.
The Germans lost prominent pilots, including Hptm. Fritz Ultsch, but also saw their aces add to their tallies, with Oblt. Helmut Wick claiming his 23rd victory.
The newly operational No. 303 (Polish) Squadron proved its aggressive prowess in combat.
The day’s attacks, which also included widespread night raids on cities like Liverpool and industrial sites across the country, prompted a decisive strategic response from AVM Keith Park.
Recognizing the threat to aircraft production, he immediately implemented new defensive measures to protect vital factories, a key tactical adaptation in the ongoing battle.

6th September
Friday, September 6, 1940, offered fine weather with a persistent haze, an unwelcome condition for Fighter Command that desperately sought a respite.
In a chilling preview of the day’s threats, Bf 110s slipped past patrols to bomb the Hawker factory at Brooklands, underscoring the vulnerability of Britain’s aircraft production sites.
...showcasing the Poles’ potent, albeit costly, aggression...
The Luftwaffe launched the first major assault at 08:40 hours, a formidable force of approximately 300 aircraft targeting Biggin Hill, Thameshaven, and North Weald. Fighter Command responded across a vast front.
No. 303 (Polish) Squadron intercepted a bomber formation near Kenley but was ambushed from above by Bf 109s of III./JG 27, losing five Hurricanes.
Despite the heavy losses, F/O Witold Urbanowicz exacted revenge, downing Hptm. Joachim Schlichting, the Gruppenkommandeur of the German unit.
His bravery earned him the acting command of the squadron, showcasing the Poles’ potent, albeit costly, aggression.
...delivering a critical blow...
A second massive raid of 200 aircraft struck just before 13:00 hours.
While physical damage to Biggin Hill was minimal, the bombs severed the recently repaired trunk communications cables, delivering a critical blow to Fighter Command’s ability to control its sector airfields.
The day’s combat also held moments of grim tragedy on the ground; near Old Romney, British troops were forced to shoot a German pilot trapped in his burning wreckage to end his suffering, a sombre illustration of the conflict’s brutality.
...unrelenting combat had created an unsustainable crisis...
As the day waned, the Luftwaffe continued to bleed pilots, but their attacks pushed the RAF to the brink.
The unrelenting combat had created an unsustainable crisis: 137 aircraft were being destroyed against only 91 being produced weekly.
Losses stood at 103 pilots killed and 128 wounded since late August, leaving entire squadrons critically understrength.
Airfields like Manston and Lympne were effectively out of action, and Biggin Hill was crippled.
..."Invasion probable within three days"...
Air Chief Marshal Hugh Dowding conveyed his gravest concerns to the high command, acknowledging that his pilots were "exhausted" and "cannot even stand up."
Despite a morale-boosting visit from the King and Queen to Bentley Priory, the seriousness of the situation was confirmed by the Home Forces issuing Alert No. 3: "Invasion probable within three days."
...the imminent, massive assault on the capital city...
That night, German Reichsmarschall Hermann Göring, hosting a lavish banquet for his commanders, broadcast his decision to personally lead the offensive.
His declaration, coupled with a reduced but still present night bombing campaign across London and industrial sites, confirmed that the tactical victory the Luftwaffe desperately sought had eluded them.
Instead, they were preparing for the strategic pivot: the imminent, massive assault on the capital city.
Amidst the night raids, a German spy, Gösta Caroli, was captured in Northamptonshire, underscoring the multilayered threat facing Britain as the most critical phase of the battle began.

Aftermath
The concentrated German air offensive, code-named Adlerangriff (Eagle Attack), reached its shattering climax in late August and early September 1940.
The aftermath of this decisive phase of the Battle of Britain was characterized by a fundamental strategic blunder from the Luftwaffe and a crucial, near-miraculous breathing space for the beleaguered Royal Air Force.
...nearly broken the entire integrated defensive system...
By the first week of September, Fighter Command was exhausted and on the very edge of collapse.
The Luftwaffe’s relentless focus on the sector airfields—the critical command-and-control hubs—had nearly broken the entire integrated defensive system.
Stations like Biggin Hill, Kenley, and Hornchurch were operational only through the superhuman efforts of their ground crews, their command rooms frequently reduced to rubble, and their communications severed.
The pilots, flying multiple sorties every day, were physically and mentally drained, with the turnover rate for fresh, inexperienced pilots becoming dangerously high.
...a catastrophic German intelligence failure...
The system was bleeding, having suffered unsustainable losses in both men and machines.
Had the Luftwaffe persisted with its single-minded campaign to obliterate these sector stations for just a few more weeks, the organizational structure of Fighter Command might have dissolved entirely, paving the way for the Germans to achieve air supremacy.
However, the tide was turned not by superior British defense, but by a catastrophic German intelligence failure and a desire for revenge.
The Luftwaffe's high command, operating with grossly inflated estimates of British losses, convinced themselves that Fighter Command was virtually destroyed.
They believed the RAF was down to its last few squadrons and had no reserve pilots left to draw upon.

Heinkel He 111P with their crew after a forced landing at West Malling, Kent September 1940. German bomber crews—flying slow Dorniers, Heinkels, and Ju 88s—faced their most terrifying ordeal during Adlerangriff. Their primary task was the difficult and costly mission of penetrating inland to strike RAF airfields. Without adequate, long-range fighter cover, they often felt intensely vulnerable. The crews endured relentless, concentrated attacks from RAF fighters, resulting in devastating bomber losses and immense psychological stress as they were forced to press on to their target areas.
...led to the fatal strategic shift...
This overconfidence, coupled with Hitler's fury over a small, retaliatory RAF bombing raid on Berlin, led to the fatal strategic shift.
On September 7th, the Luftwaffe irrevocably changed its primary focus from the airfields to the city of London itself.
This decision, which ushered in the large-scale nocturnal bombing campaign known as The Blitz, was the single greatest error of the entire Battle of Britain.
The immediate aftermath of Adlerangriff gave the RAF exactly what it needed: time to recover.
The cessation of heavy daylight bombing on the sector stations allowed the heroic ground crews to work furiously to repair the damage.
Craters were filled, vital communications were restored, and the shattered operation rooms were patched up.
...proving the resilience of the system...
The pressure valve was released, and the replacement pilot pipeline, though severely strained, began to flow more smoothly into squadrons that could now afford a moment's rest.
By shifting their attack to the sprawling metropolis of London, the Luftwaffe was effectively attacking the body, but allowing the head - Fighter Command - to recuperate.
The integrated defensive structure, which had been poised to break, held firm, proving the resilience of the system.
...to ultimately postpone and later abandon Operation Sealion...
The German objective of destroying the RAF as a fighting force was irrevocably lost, ensuring the skies over Britain remained contested and forcing Hitler to ultimately postpone and later abandon Operation Sealion, the planned invasion.
Did the resilience of the ground crews in repairing the sector stations make a bigger difference than the influx of replacement pilots during this critical pause?

Assessment: Misguided Strategy and Tactical Brilliance
The Luftwaffe's performance during Adlerangriff was a paradox of overwhelming operational strength marred by fundamental strategic confusion.
The core German strategic failure was underestimating the depth and resilience of the British air defence system.
Based on faulty intelligence that continually overestimated RAF losses, the Luftwaffe leadership, particularly Hermann Göring, failed to maintain a clear, consistent focus.
Initial attacks on coastal radar stations were highly effective, but this focus was repeatedly abandoned.
The later concentration on fighter airfields and sector stations (the correct strategy to break the RAF) was devastatingly effective but was not pursued long enough.
The ultimate pivot to bombing London was a fatal error, giving Fighter Command the precious time it needed to recover.
...a disastrous failure...
The Luftwaffe possessed superior numbers and, arguably, the better fighter in the Messerschmitt Bf 109E.
Fast, robust, and capable of high-altitude performance, the '109' consistently outperformed the Hurricane in a turning fight and had better diving speed.
However, the twin-engined Messerschmitt Bf 110 Zerstörer (Destroyer) was a disastrous failure, proving vulnerable and requiring heavy escort.
...often stifled their effectiveness...
Tactically, the Germans were rigid. The bombers were often tied to slow, close formations, making them vulnerable.
Fighter escorts were frequently restricted to remaining near the bombers, neutralizing the superior speed and altitude advantage of the Bf 109s and preventing them from executing their preferred tactic of "free-hunting" (freie Jagd).
The Luftwaffe had excellent fighter leadership, exemplified by aces like Adolf Galland, but strategic control from above often stifled their effectiveness.
...sheer individual courage...
The RAF's success rested less on overwhelming strength and more on organizational brilliance, sound strategy, and sheer individual courage.
The RAF’s strategy, executed by Air Chief Marshal Hugh Dowding and commanders like Air Vice-Marshal Keith Park (No. 11 Group), was fundamentally sound.
Their guiding principle was the conservation of fighter strength. Park’s meticulous use of small, concentrated squadron strength, vectored precisely to intercept incoming raids, ensured they only engaged when tactically necessary, frustrating the German attempts to force a decisive battle.
Dowding's system allowed his forces to fight "last-ditch" battles over the airfields without ever committing his entire reserve, thus guaranteeing survival.
...an excellent bomber killer...
The RAF's equipment was functional and well-suited to its defensive role. The Hawker Hurricane was the workhorse, rugged, easy to repair, and an excellent bomber killer.
The Supermarine Spitfire was the superior high-altitude interceptor, effectively challenging the Bf 109 on equal terms.
Tactically, the Dowding System, which integrated Chain Home radar, Observer Corps, and Fighter Control, was the decisive factor.
It provided up to 30 minutes of warning, allowing pilots to take off, gain altitude, and position themselves before the enemy arrived.
This integrated system maximized the effectiveness of every available fighter and pilot. While pilots were often overworked, their willingness to scramble multiple times a day under gruelling pressure proved the ultimate demonstration of resilience.
...refused to panic...
Adlerangriff was a near-run thing.
The RAF survived because German intelligence failed, German strategy was flawed, and because British leadership - particularly Dowding and Park - refused to panic or commit to a grand, winner-take-all battle.
The RAF's success was not achieved by winning every skirmish, but by winning the war of attrition and ensuring the integrated system never fully broke.
The Luftwaffe's tactical brilliance could not overcome their strategic myopia.

Further reading